Rubik's Cube- an interesting childhood puzzle. Although many adults are not averse to having fun with this curiosity. At first glance, you can tell that this is an ordinary cube with six sides of different colors. But this is only at first glance. The puzzle is quite complex and not every brave person can do it. Therefore, today we will try to explain in as much detail as possible how to assemble a toy from our childhood.
The main thing in the article
How to learn to solve a Rubik's cube?
- The original idea for the magic cube was to teach students mathematical group theory. So in 1970s years, Hungarian architect Ernő Rubik created a mechanical tool that was a learning cube for understanding three-dimensional models and moving independent parts.
- After a short time, great fame came to the magical patented cube. People of different professions and from different countries became interested in it. So, in 1980s For years, the whole world knew about him, he won many competitions and was awarded all kinds of prizes.
- The mechanism includes an internal and external part. The inner one is a figure consisting of three connected cylinders. External - edges attached to the internal mechanism, which in turn consist of squares.
- By rotating the edges of the faces in different directions, you can solve a Rubik's cube. Over the years, many people worked on the magic cube, as a result of which many techniques were created. Now there are even some algorithms, using which you can quickly solve a cube.
- The cube consists of three elements: centers - 4 , angles - 8 and ribs - 12 .
How to solve a Rubik's cube quickly and easily: the main rules

- It is necessary to rotate not only the color sectors, but also the cube itself.
- You need to focus on the central figures.
- In the original version, yellow is always opposite white, orange is opposite red, and green is opposite blue.
- It is necessary to move the middle and corner sectors, in accordance with the colors of the central figures.
- Each new movement creates a new angle and center segment.
- The centers do not change, no matter what confusing position you bring the cube into, there will always be white at the top, yellow at the bottom, green in front, blue in the back, red on the right, and orange on the left.
- The edge elements have two stickers, and the corner elements have three.
- Since the color fragments do not change their position, the cube will always be assembled in the same way.
- There are ribs comfortable- looking left and right, and uncomfortable- located below or above. There are also ribs that stand still or under the cross.
How to solve one or two sides of a Rubik's cube?

- In order to assemble one of the sides, you need to create a cross of one color on any of the faces. The starting point will be the central fragment of one of the flowers.
- Having chosen the desired color located in the center, direct fragments of a similar color towards it, creating a cross.
- Next, you need to assemble corners of similar colors. To do this, you need to move the found color to the edge of the side to be assembled.
The cross will be assembled correctly if the centers on the other faces match the edges in color.
- Find the white center.
- Then place comfortable ribs that face you.
- Afterwards, tackle the inconvenient ones. Scroll the edge to the left or right and make it convenient for placing a cross.
- Afterwards, scroll the top to make room for the rib.
- Next, add the corners. They are either top or bottom. The top corners move initially.
- Select a corner and bring it to the center of those colors whose color stickers are located along with the white corner.
- Then twist the formula "bang Bang" until the corner is in place.
To ensure that all centers coincide with the ribs, always twist one clockwise motion and check.
When the moment comes that the centers and edges on two faces do not coincide, then you need to use the formula "bang Bang".
- Formula "bang Bang"— algorithm of repeated movements. The white cross is facing up, clockwise move the right side one movement, then move the top clockwise. Afterwards, move the right part counterclockwise, that is, return it back, and return the top back counterclockwise.
The second side is assembled in a similar way. To do this, you first need to assemble the correct cross, the first side and move the edges so that they coincide with the centers in color. Next, move the corners according to the formula.
How to solve a Rubik's cube completely?

In order to assemble the entire mechanism, you need to use the lesson on assembling one side. Afterwards the second and the remaining parties gather.
How to solve the corners of a Rubik's cube?
- The corners of the cube are divided into upper and lower. The top ones move first, as they are the easiest to move.
- The secret is that, having found the top corner, you need to move the white sticker so that the other corner stickers are located with their centers.
- And then the angle moves according to the formula "bang Bang".
How to solve a Rubik's cube layer by layer?

- Collect the correct white cross.
- Create one white layer.
- Find the ribs without the yellow stickers.
- Remember the color of the edge and match it with the corresponding color.
- Now do everything with your right hand.
- Place the two centers in front of you at an angle 45°.
- Hide the colored element in that direction so that it is not visible, twisting the edge in one motion.
- Lift up the right corner.
- Return the hidden rib.
- And return the corner. You should get a pair of two colors.
- Next, follow the same algorithm to move all the fragments into place.
How to solve a Rubik's cube with pictures for beginners: step-by-step instructions

How to solve a Rubik's cube: clear diagram and formulas

How to solve a 3x3, 5x5 Rubik's cube very quickly?

- Cross— assembly of a cross, four rib cubes on the bottom edge;
- In order to assemble the mechanism very quickly, you can use the method - CFOP which stands for:
- F2L(First two layers) - assembly of two layers - bottom and middle;
- OLL(Orient the last layer) - correct orientation of the cubes of the top layer;
- PLL(Permute the last layer) - placement of the cubes of the top layer.
- Also, during high-speed assembly, the mechanism itself is of no small importance, how well it is lubricated. After all, the speed of movement of the faces depends on this.
- Another secret is to skillfully use both hands and all fingers, directing the edges in the desired direction.
- There should be no pauses; when one move is completed, it is necessary to move on with lightning speed.
- Having studied all the algorithms, you need to know in advance what your next step will be.
- Practice, and only it helps in quickly collecting the magic cube.
How to solve a Rubik's cube in 20 moves?
God Number — 20 steps in which you can assemble the positions of the magic mechanism. Represents an algorithm of actions, the number of which is equal to 20 . The video below shows a slow circuit consisting of exactly 20 steps.
This video shows a diagram of 18 steps for advanced speedcubers.
How to solve a Rubik's cube: the easiest way
To make it more clear, watch the video, which clearly and clearly explains the easiest method of collecting a magic cube.
How to solve a Rubik's cube in a minute?
Ability to assemble a mechanism 1 minute is that you know all the simple algorithms. With the help of them and the speed of your fingers, you can easily solve the intricate Rubik's mechanism.
How to solve a Rubik's cube with your eyes closed?
To be able to fold a cube with your eyes closed, you need to know by heart all the algorithms and the location of all the colors on the cube. And this requires practice.
How to solve a Rubik's cube easily for kids?

- Before teaching children the mechanism of the Rubik's cube, you need to familiarize them with terminology that is understandable to the child.
- Afterwards, you need to turn on your imagination and ask questions that will help the child understand how to move the figure.
- Maxim Chechnev's technique helps children of different ages master a quick collection scheme.
How to solve a Rubik's cube: Maxim Chechnev
Methodology Maxim Chechneva helps even children assemble the magic mechanism. In his training, he explains in detail how to correctly and quickly learn the basics of mastery. His video lessons are aimed at understanding the mechanism of the cube itself. It interests children with leading questions and helps them master the correct technique in a fairly quick time.
How to Solve a Rubik's Cube: Tips from Jessica Friedrich

Jessica Friedrich- speedcuber, who 1980s years, she took first place in a mechanism assembly competition. In addition, she created her own collection method - CFOP, it is divided into 4 stages:
Tips from Jessica:
- High quality mechanism;
- Silicone Grease;
- Patience, endurance and practice.
How to solve a disassembled, broken Rubik's cube?
If your cube broke or you wanted to look at the mechanism from the inside, then we suggest you watch the video, which describes in detail how to assemble the magic cube.
How to solve a Rubik's cube: video slowly
Assembling a magical mechanism allows you to develop not only memory, but also logical thinking, fine motor skills, diction and the ability to make quick and correct decisions. With the help of a magic toy, you can develop intelligence, introduce children to a fun game and not waste time.
There is no puzzle more famous than the Rubik's Cube. Since its appearance, this toy has captured the minds of not only children, but also adults. Every year competitions are held to test the speed of assembling multi-colored faces. If you want to take part or surprise your friends, read how to solve a 3x3 Rubik's cube. The easiest way is described below.
Rubik's Cube: basic rules and concepts
Before moving on to the Rubik's cube assembly scheme, you need to understand the basic rules and concepts. Alas, we can’t get anywhere without this information. Many will not understand what needs to be done and why.
Let's start with the pieces of the puzzle:
- Centers are located in the center of the cube and do not move relative to each other. There are six of them in total - one for each face.
- The ribs are two-color elements. Perpendicularly adjacent to the central part of the puzzle. Total quantity - 12 pcs.
- Corners are three-color details that are located at the corners of the structure. There are eight of them.
- The frame is the base on which the centers are rigidly planted. That is why they do not move relative to each other.
A standard Rubik's cube has three layers and six sides. Each of them has nine colored cells that can be simultaneously moved relative to the frame. To correctly apply assembly formulas, you need to learn the notation of faces:
- The top one is marked with the letter U (Up) or “B”.
- The lower one is designated D (Down) or “H”.
- Right - marked as R (Right) or (P).
- Left - in the formula has the symbol L (Left) or “L”.
- Front - listed as F (Front) or “Pr”.
By default, one rotation of a face is considered to be an angle of 90 degrees. If there is no special mark in front of the symbol, the rotation is performed clockwise. That is, if the combination says U, then you need to rotate the top of the cube once as the clock progresses.
If you see the designation L2 or any other with the prefix “2”, then the corresponding part of the puzzle must be rotated twice.

Designations with a prime F" mean that the turn is performed counterclockwise. Accordingly, F"2 is a double turn in the same direction.
Now you need to understand a few rules, without which the application of the formula will turn into a meaningless rotation of elements. Here's what you need to know:
- It is important to hold the cube correctly during assembly. One of the centers of the puzzle must “look” at you until the end of the combination.
- You need to rotate the faces in order and only in the indicated direction.
Remember these rules well: the final result depends on them.
How to solve a 3X3 Rubik's cube
So, how to solve a 3x3 Rubik's cube? Let's highlight several stages:
Stage No. 1. We are building the correct cross.
The correct cross is a center with adjacent edges of the corresponding color. For example, if the center is yellow, then the edges should be yellow. In addition, the second color of the ribs should match the center of the side edges. For clarity, take a look at the figure below:
For all the elements to fall into place, you need to:
- Until the end of the stage, make sure that the yellow center “looks” up.
- Find the rib with the yellow sticker. In our case, this is a yellow-blue element.
- Move it down. To do this, depending on the position of the element, rotate the right or left side of the cube one or more times. In the example below we do R.
- Align the blue side of the element with the corresponding center of the D cube."
- Place the rib in its rightful place by double turning the front part F2.
Note: if at the end, the edge colors are oriented incorrectly, use the sequence: F, U", R, U.
For the remaining edges, proceed in the same sequence, only first turn the cube towards you with the other center (yellow is still on top).
Important: After collecting several edges, can't you place the next one without moving the previous ones? Apply the pattern R" D" R.
Stage No. 2. Arranging corners and assembling the first layer.
The task for this stage: select a corner, lower it down, then twist the element to the desired place and apply the formula until the colors match. This is what should happen ↓↓↓
To assemble, follow this sequence:
- Place the yellow center so that it faces up.
- Select any corner element. For example, let's take yellow-red-blue.
- If it is on the bottom, make one or more D turns so that the corner is underneath where you want to put it. After this, follow the formula: R" D" R D.
- If the desired element is located at the top, rotate it so that it is on your right side.
- Next, follow the same method: lower the element down, twist it and apply the combination: R" D" R D.
Do the same with other corner elements.
Stage No. 3. Solving a Rubik's cube: middle layer.
Here proceed as follows: find and correctly orient the edge, apply one of the proposed sequences. This is what the cube should look like at the end of the stage ↓↓↓
Assembling the middle part of the puzzle may seem tricky to some, but with practice, you realize that everything is not so difficult. The main thing is to follow the instructions exactly:
- Turn the Rubik's cube over so that the white center is at the top. The rule is the same as with the yellow cross - we hold the position until the end of the assembly.
- Find the element at the top where there is no white sticker. How about green and orange?
- Rotate the middle section so that the green or orange piece aligns with its centers.

Now we use two combinations:
- U" L" U L U F U" F" - for green.
- U R U" R" U" F" U F - for orange.

Note: if the edge is initially in place, but the colors are twisted, use one of the combinations above until you knock the element up. Then follow the steps of step No. 3, starting from the second point.
Stage No. 4."Wrong" cross.
It remains to assemble the last layer. This is where most people stopped, because in order not to disrupt the integrity of the assembly, it is necessary to use longer combinations than in the previous stages.
First you need to make an “incorrect” white cross. That is, let's move the white cells to the top edge, not paying attention to the side colors. After completing the third stage, one of four situations should arise ↓↓↓

If the white cross turns out automatically, congratulations - move on to the next step. Other options will require a little work:
- Take the cube as shown in the picture above. That is, the white corner should be to your left, and the white stripe should be horizontal.
- To assemble the cross, use the sequence: R U R" U" F".
The combination works for any of the three options.
Note: if after the third stage not one of the possible patterns has formed on top of the cube, it means that someone decided to prank you. It is likely that the cube was disassembled and then reassembled incorrectly. To repair the toy, disassemble and fold the colored edges by hand.
Stage No. 5. Assembling the “correct” cross.
This stage in some way repeats the first. It is necessary to place the edges of the top face so that the side colors coincide with the corresponding centers. This is what should happen ↓↓↓
Rotate the top of the cube until any two edges match the colors of the side centers. As a result, you will get one of two options (see picture below).

If two opposite elements (1) coincide with the centers, use the sequence: R, U, R", U, R, U2, R". After this, you should get the second option (2), when the matching elements are located at an angle. In this case, use the combination: R, U, R", U, R, U2, R", U.
Important: During assembly, hold the cube relative to you as shown in the image above.
Stage No. 6.
If everything is done correctly, assembling the white “correct” cross should lead to one of two situations:

- None of the corner elements were in the right position.
- One of the corners fell into place.
In the first case, you need to do this: U, R U", L", U, R", U", L. So we come to the second situation.
- Clockwise (place the assembled corner closer to you on the left side): U", L", U, R, U", L, U, R".
- Counterclockwise (the assembled element “looks” at you and stands on the right side): U, R, U", L", U, R", U", L.

Stage No. 7. We turn the corners.
The final stage comes down to applying a simple formula called “four”. It looks like this: R", D", R, D.
To turn a corner, turn one side of the cube towards you and hold it in that position.
Turn the corner that is closest to you on your right hand. Apply the above combination 2-4 times until the element is twisted.
Note: after turning the corner, the integrity of the assembly will be compromised. Ignore it and move on to another element.
Next, holding the puzzle in the same position, rotate the top (U) and engage the “four” again. When you unfold the last piece, all the other pieces of the puzzle will fall into place. That's it - the puzzle is solved!

Now you know how to solve a Rubik's cube in the fastest way. At first it seems like a difficult task, but with experience it will take less and less time to assemble. It really works! The main thing is regular practice and not giving up at the first failures.
In 1975, sculptor Erne Rubik patented his invention called the Magic Cube. For more than 40 years, all rights to the puzzle have belonged to the company of the inventor's close friend, Tom Craner, called Seven Towns Ltd. The English company controls the production and sale of the cube throughout the world. In Hungary, Germany, Portugal and retained its original name, in other countries the toy is called a Rubik's cube.
Types of puzzles
The classic Rubik's cube measures 3 by 3 squares. Over time, they came up with a huge number of shapes and sizes for toys. No one can be surprised by a puzzle in the form of a pyramid or a cube size of 17x17. However, humanity never stops there.
Obviously there is no beginner's guide to building this cube. The process of assembling and solving the puzzle can take years. Recently, interest in the cube has been growing not only in Asia and Europe, but also in places where the toy was not very popular, for example, in the USA. One of the fans of the Rubik's cube filmed the assembly of a 17 by 17 puzzle. The total length of the video was 7.5 hours, filming took place over the course of a week.
Growing demand creates supply. Sometimes the models sold are incredible and it is not always clear what they will look like when assembled. Each country has its own favorite types of toys.
What is speedcubing?
Fans of the game organize real competitions in how quickly they solve the cube. There are special “speed” puzzles on sale. The rotation mechanism of such Rubik's cubes is very high quality, and rotations of faces and rows can be done with the movement of one finger.
The World Cube Association (WCA) is a non-profit organization supporting the speedcubing movement. The WCA regularly organizes competitions around the world. There are representatives of the organization in almost all countries. Anyone can become a participant in a speedcubing event; you just need to register on the website and meet the assembly standards. The most popular discipline at such competitions is speed solving a 3x3 Rubik's cube. The standard for participation is 3 minutes, but even if a person cannot solve the problem in the allotted time, he will still be allowed to participate in the event. You can sign up for any discipline, but you need to come with your own puzzle.

The record for solving a 3x3 Rubik's cube belongs to the robot Sub1, created by engineer Albert Beer. A machine can solve a puzzle in a fraction of a second, while a human will need 4.7 seconds (Mats Valk's achievement in 2016). As you can see, participants in the speedcubing movement have someone to look up to.
What algorithms exist for solving a 3x3 Rubik's cube?
There are many ways to solve a famous puzzle. Variants of 3x3 Rubik's Cube assembly schemes have been developed for both beginners and advanced people with complicated schemes: 4x4, 6x6 and even 17x17.

The 3x3 version of the puzzle is considered a favorite classic among most fans. Therefore, there are much more instructions on how to solve a 3x3 Rubik's cube than any other.
What should the puzzle look like?
You can assemble the toy according to the diagram only from a pre-prepared position. If the patterns on the faces of the cube are located incorrectly, then it will not be possible to solve it using the algorithm for solving a 3x3 Rubik's cube for beginners. There is a set of such positions for different solution options.

The picture shows or simply a “cross” - the starting point of the easiest way to solve a 3x3 Rubik's cube. It is recommended to disassemble and fold the toy correctly.
Designations of circuits and methods of rotating the cube
Before you start disassembling the 3x3 Rubik's cube formulas, it is worth learning the notations used in speedcubing. All puzzle movements are indicated in capital letters. The absence of an apostrophe above the symbol means that the rotation is clockwise; if there is a sign, then the rotation should be in the opposite direction.
The first letters of English (or Russian) words denoting movements are considered generally accepted:
- front - F or Ф - rotation of the front side;
- back - B or T - rotation of the back side;
- left - L or Л - rotation of the left row;
- right - R or P - rotation of the right row;
- up - U or B - rotation of the top row;
- down -D or H - rotation of the bottom row.
Pointers can also be used to change the position of the cube in space - interception movements. Here, too, everything is simple, everyone knows the coordinate axes X, Y and Z from a school geometry course. Movement X means that the cube must be rotated with face F to the place of face U, when shifted Y - F becomes in place L, and when rotated Z - F moves to R.
The following group of notations is rarely used; it is used when drawing up pattern diagrams:
- M - turn of the middle row, between right (R/R) and left (L/L);
- S - rotation of the middle row, between the front (F/F) and rear (B/T);
- E - rotation of the middle row, between the top (U/B) and bottom (D/H).
Why do they collect patterns on the faces of the cube?
At speedcubing meetings, people compete not only in solving a puzzle, but also in their ability to create various patterns on a 3x3 Rubik's cube. They do this in order to quickly and easily assemble the cube into the desired position.
There are a huge number of schemes for assembling a wide variety of patterns: “dots”, “chess”, “dots with chess”, “zigzag”, “maison”, “cube in a cube in a cube” and many others. There are more than 46 of them for the classic puzzle alone. Speedcubing masters consider it shameful to disassemble a toy. Also, making patterns on a 3x3 Rubik's cube is a great way to practice and improve your skills.

The picture shows variations of different puzzle patterns. Below are a few more formulas for assembling the most interesting patterns from the cross position:
- chess - M 2 E 2 S 2;
- zigzag - (PLFT) 3;
- four z - (PLFT) 3 B 2 H 2;
- Plummer's cross - TF 2 N"P 2 FNT"FN"VF"N"L 2 FN 2 V";
- cube in a cube in a cube - V"L 2 F 2 N"L"NV 2 PV"P"V 2 P 2 PF"L"VP".
Algorithm for solving a 3x3 Rubik's cube for beginners
Although there are many ways to solve the puzzle, simple and understandable diagrams for beginners are not so easy to find. With each passing stage of assembly, the formulas for the 3x3 Rubik's cube become more complex. It is necessary not only to correctly change the pattern, but also to preserve what was done before. Below is one of the options for how to easily solve a 3x3 Rubik's cube.
Conventionally, the whole process can be divided into the following stages:
- Assembling a cross at the top edge of the cube.
- Correct composition of the entire upper edge.
- Work on the middle layers.
- Correct assembly of the ribs of the last row.
- Assembling the cross of the bottom edge.
- Correct orientation of the corners of the last face of the cube.
Solving the puzzle - preparatory work
The first stage is the easiest. Beginners can try their hand at making cube patterns using the instructions provided, but the process will take a long time.

You need to select the top edge and the color that will be assembled first. The algorithm for solving a 3x3 Rubik's cube for beginners is developed from the "cross" position. It is not difficult to make, you need to select a central color, find 4 edge elements of the same shade and raise them to the selected edge. The colored arrow in the picture points to the part you are looking for. Options for the location of the desired element may be different, depending on this, 2 sequences of actions A and B are described. The difficulty lies in continuing the cross along the sides of the cube. You can take a closer look at the final view of the stage in the image above.
Solving the puzzle - working on the middle row

At this stage of the 3x3 Rubik's cube assembly scheme for beginners, you need to find and assemble the corner elements of the top face. The end result should be to completely solve the cross face and the top row of the puzzle.

The image shows three possible edge patterns. When choosing one of methods A, B or C, you must collect all 4 corners of the cube. By memorizing rotation algorithms and practicing them, you acquire the skills and mastery of assembling a puzzle. It is pointless to consider formulas and imagine the process; it is much easier to take a cube and try all the methods in practice.

The third stage seems simple, but it is only apparent. To solve it, two situations of patterns are described and two rotation formulas are compiled accordingly. When using them, it is worth remembering to preserve previously achieved results. Masters constantly keep the last 3-4 rotations in memory so that in case of failure, they can return the cube to its original state.

To solve a puzzle, you need to rotate it along the coordinate axis in search of the necessary elements and work with them. Such movements are rarely shown in formulas, only in special cases. It is recommended to start assembling the edge faces from the elements of the bottom rows; after such rotations, all the necessary cubes will descend from the middle to the bottom row.
Solving the puzzle - making the second cross

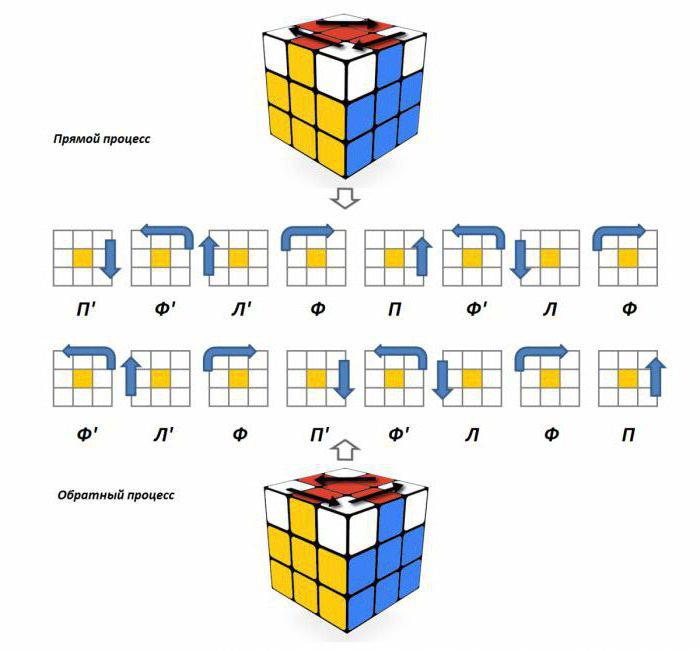
At the fourth stage, the toy is turned upside down. Solving the last face is the most difficult part of the 3x3 Rubik's Cube algorithm for beginners. The rotation formulas are long and complex, and their execution will require special care. The purpose of the action is to place the edge elements in their places for further composing the cross. The orientation of the rib parts may be incorrect. There is only one formula for cube movements and it should be applied until the goal of the stage is achieved.

The rotations of the fifth stage are aimed at turning the elements to the correct side. Its peculiarity is that the same rotation formula is used for all three patterns in the figure, the only difference is in the orientation of the cube itself.
The formulas for stage 5 movements are as follows:
- (PS N) 4 V (PS N) 4 V" - option “A”;
- (PS N) 4 V" (PS N) 4 V - option “B”;
- (PS N) 4 V 2 (PS N) 4 V 2 - option “B”.
C H is the rotation of the middle row clockwise, and the exponent above the bracket is the number of repetitions of the actions in brackets.
Puzzle solution - last spins
At the sixth stage, as at the fourth, the necessary cubes are placed in their places, regardless of their orientation. The puzzle should be rotated so that the element that is already in the right place is located in the far left corner at the top of the cube. The options proposed to solve the formula mirror each other. It is necessary to repeat the rotations until the desired result is achieved.

The seventh stage is the most solemn and the most difficult. When rotating the cube, violations in already completed rows are inevitable. You will need to fully concentrate on the movements, otherwise the result of the assembly may be irretrievably ruined. As in the fifth stage, there is only one sequence of movements, but it is repeated 4 times. First, rotations are performed to orient the element, then reverse rotations are performed to restore broken rows.
We should not forget about recording movements using the English alphabet. The formulas for the movements of the faces and rows of the cube at this stage are as follows:
- (RF"R"F) 2 U (RF"R"F) 2 - option “a”;
- (RF"R"F) 2 U" (RF"R"F) 2 - option “b”;
- (RF"R"F) 2 U 2 (RF"R"F) 2 - option “c”.
B - rotate the top face 90 degrees, B" - rotate the same face counterclockwise, and B 2 - double rotate.
The difficulty of this stage is in correctly assessing the location of the elements and choosing the required rotation option. It can be difficult for beginners to immediately correctly identify the pattern and match it with the correct formula.
Rubik's cube and children
This tricky puzzle is interesting not only for adults, but also for children. Teenagers have become world record holders for solving the Rubik's cube. In 2015, Colin Burns, who was only 15 years old at the time, assembled the toy in 5.2 seconds.
A simple but fascinating toy continues to interest the younger generation for the 5th decade. A childhood hobby often develops into a profession. There are mathematical ways to evaluate solutions to Rubik's cube problems. This section of mathematicians is used when compiling and writing solution algorithms for automated computers. Robots that actually look for ways to solve the cube, rather than following a pre-written algorithm of movements, solve the puzzle in 3 seconds, for example, CubeStormer 3.
Solving a Rubik's cube can be difficult for both adults and children, and if after several attempts you have not succeeded, do not despair, simple and understandable 3x3 diagrams will help you figure out the puzzle. There are many different ways to do this, because the best minds spent their time on this and gave amazing results in the form of schemes and algorithms.
The easiest way to assemble for those who are just starting out
This scheme is considered the simplest and is great for children. It starts with assembling a cross, in other words, each edge should have the same color of the central die and corner elements. At the beginning of the assembly, the Rubik's cube must be disassembled. Assembly diagram 3*3 in 8 stages.
First, you need to take the cube in your hands and turn one of the sides towards you, respectively, taking its frontal side - F, all the rest according to the diagram. Assembly must begin from the bottom (H).
Below is a diagram of this approach:
- Having chosen the color you want to start first, we begin assembling the lower cross. This is a simple step, the complexity of which ends solely with the choice of color. What is on the other sides of the cube at this stage should not attract attention.

Stage of solving a Rubik's cube
- The cross must be assembled correctly - the cross must end on adjacent edges. This means that the edges located at the top of the mating sides should have the same color as the cross at the bottom. If this did not happen during assembly, then there are two available algorithms that can correct the situation:
- The discrepancy on two adjacent sides is corrected by the scheme:
P V P»V P V2 P V
- If the error is on opposite parts of the cube, then you can try the following formula:
F2 T2 N2 F2 T2
When working with these algorithms, the cross should be at the top.
- Completely solve one side of the Rubik's cube. To do this, you need to put the corners in place. Turning the puzzle over with the already assembled cross facing down, you will notice that the upper corners of the sides adjacent to H have acquired the same color as the cross. That is, if the cross is yellow, then the corner elements in question will also be yellow. With such a scheme, only three options for the position of the base color can be possible: on the left, on the right, or on top, and for each such position there is its own assembly scheme:

The result of applying such algorithms is one completely assembled color, and the upper stripe of the adjacent side has one color.

We continue the assembly
- If you want to solve a Rubik's cube at speed, then there are a few more important and relevant formulas for you to remember. We turn the side that is already completely ready up. We begin to twist the bottom edge until the color of one of the side elements matches with any of the sides and form the letter T. Then, it is necessary to move the side element from the bottom edge to the middle until it matches the color of the adjacent sides. As a result, we get two variants of positions in which:
- Left turn required: N L N»L» N» F» N F.
- Move to the right: N» P» P N P N F N» F».
- Now it’s time for the third layer. We turn the toy itself over so that the side that has not yet been folded is at the top. Most likely, the opposite color became white if you chose the most popular color to start the build, yellow. If there are white dies in front of your eyes with any position described below, then I proceed according to the following formulas:
White dies: central and 2 opposite F P V P" V" F".
White dies: center and two on the side F V P V" P" F".
White dies in the center, choose the pattern you like and repeat 2 times.
- Another correct cross with the top edge matching in color with the adjacent ones, in which 2 outcomes are most often possible:
But, if this does not affect the situation in any way, then you can use any options.

- Quite a difficult stage at which it is necessary to put the corner elements in their rightful places. And it's not that simple. Most often there is a lot of confusion in the layers, but if you do it right, eventually each color block will fit where you want it.
- Stage number eight is associated with the same angles and circular turns:
Clockwise P2 B2 “P F P” B2″ P F P .
And in the opposite direction: P" F P" B2″ P F" P" B2″ P2 .
Any of these algorithms will also be useful when moving in corners: crosswise or opposed.
The mirror cube is also assembled using the same algorithms, but those who want to break the record should know that only the 3*3 model applies to this indicator.
For clarity, the assembly of the 3*3 model can be seen in the video below:
How to solve a 3x3 Rubik's cube - quickly and easily. The best technique for beginners.
Seven steps to assemble
- First, make sure that the cube is disassembled. This will mark the beginning of stage number 1. The stage ends by assembling a cross on the top side of the cube, and the upper middle edges of the sides should match the center in color. One of the dies of the upper cross should be located on the edge of the bottom. To do this, we take either the first or second option.

![]()
The operation is repeated for all remaining cubes of cross B.
- Stage two starts with the upper part of the cross assembled and ends with the upper part fully assembled. How does this happen? The diagram popularly explains the entire sequence of actions. We take the corner element of face B and move it to H. Depending on the color distribution, you need to choose your solution.


With three cubes of the corner of the upper face, you need to repeat exactly the same thing.
- It is not difficult to guess that the beginning of the next stage is always the result obtained from the previous one. As we remember, the previous goal was to assemble the face completely. If the goal is achieved, then you can begin to implement a new task: assembling the two top layers.
To simplify, let's again turn to the help of diagrams. It is necessary to move the selected side cube down. Next we select:

We continue the assembly
As usual, we repeat everything and stirrup with the last dies.
- The cube assembled with two belts must be placed in layers down. This part will end with the cubes from cross B in their place, but upside down. You just need to rearrange the cubes in the middle part until everything falls into place.


These actions will have the effect of breaking, but do not be afraid. Repetition is the mother of learning. Let’s fix the algorithm and voila – we have a cube in front of us where everything is in its place. But you need to change the irregular cube in your hands a little spatially, turning it over to the face on the right.
- In this step, we take the beginning, as always, from the end of an already completed step. Let's go according to the scheme.

- At the end of the step, the cube will be completely assembled, but it will begin with all the corners being where they should be, but possibly upside down.
There may be two positions.

To perform a revolution we perform the following steps:

The algorithm is applied until the PV becomes correct. Again, things can go wrong, but that's okay if you trust consistency over and over again. Before repeating, place another “wrong cube” in the corner on the right. Repeat until the cube is completed.
Jessica Friedrich Method
Jessica Friedrich's method is one of the fastest methods for solving a Rubik's cube.
In 1981, Jessica Friedrich developed her own assembly plan, which has all the same main points and has no fundamental differences, but it significantly speeds up the process. You just have to learn “only” 119 rules. If you want to break the record, you'll have to use your brain.
If you are just starting out and spend two minutes or more on assembly, then this method is not for you yet; practice using the eight-step instructions.
- This method begins with the same assembly of a cross with edges on the sides. In English, the name of this step sounds like Cross and translated means cross.
- The second stage involves assembling two layers of the cube at once and is called F2L (an abbreviation for the phrase First 2 Layers, which literally translates as the first two layers). Algorithms describing this path are given below:

- The OLL stage means solving the top layer of the Rubik's cube. It will be described by 57 formulas.

- The final, fourth stage is called PLL and means placing all the elements in their places. The last stage can be described by these algorithms:

15 steps to assemble a 3*3 cube
In 1982, competitions appeared for the first time, in which those who wanted to complete the puzzle the fastest took part. In connection with the discovery of such games, more and more new formulas and algorithms for solving the problem began to appear. But in fifteen moves no one has yet managed to cope with the task. Even a build using 8 stages involves many more moves. The God algorithm given below has twenty such moves.
The discovery of such a quick assembly belongs to a team from Google; in 2010 they released their solution to the Hungarian sculptor’s puzzle.
Now, if you hear somewhere again about the 15-step solution system, you can safely argue with him, there is no chance that his resource will exceed the resources of such a powerful company. Those who want to learn how to solve a cube with the fastest and probably the youngest method among the fastest ones can pick up toys and use the diagram shown in the picture below.

Secret assembly technology
Those who want to cope with the task in a time equal to or less than a minute should learn a few simple rules.
- White and yellow colors will be an excellent solution for starting the build.
- Many precious seconds are spent turning the Rubik's cube in your hands, which, of course, negatively affects the temporary results. That is why they begin the assembly by assembling the cross on the bottom edge of the puzzle. This way you will save time on turning the toy over in confusion.
- The size of the 3*3 cube is good for the hand and its surface is already quite slippery and rotates well, but for greater success you can purchase a special, not very expensive lubricant for such objects.
- Always be one step ahead: at the moment when mental stress has already subsided and you are completing one of the algorithms that will definitely lead to success, it’s time to think about the next step.
- Use all your resources: all your ten fingers. This is what will lead to new records in solving the cube.
With your eyes closed? Easily!
Do you want to surprise everyone with your ability to solve a Rubik's cube without watching the process? Learned algorithms will help you deal with this. In addition, follow a few simple rules:
- Keep a picture of the puzzle in your head, it should always be mentally before your eyes and remember the golden rule, which states that it is best to start assembling from the bottom edge. And do not forget about the immobility of the centers relative to the sides.
- Solving the cube with your eyes blindfolded or closed will definitely amaze those around you. The invented algorithm says: orient the corners correctly! As a rule, all corners contain two colors: it is either yellow or white.
- Correctly position the side elements of the puzzle and whether its orientation is correct.
Modern varieties of Rubik's cube
The Rubik's Cube was created by the Hungarian scientist Erno Rubik; the professor and sculptor used this model to explain to his students the basics of mathematics, namely the mathematical theory of groups. In that same 1974, Rubik could not even imagine that this attempt to clearly demonstrate mathematics would make him a millionaire.
The assembly of the item took about a month, during which time it underwent many changes, mainly related to size. The scientist tested the future toy on his friends and loved ones. The patent was received in 1975, and the first batch was published only in 1977. “Magic cubes,” as the invention was dubbed, first appeared in Budapest, in a small cooperative just in time for the Christmas holidays. Several pieces from that very first batch ended up in the USSR.
Such mathematics soon interested the minds of other people. Tibor Lakzi started promoting the cube as a puzzle game. It was with his help that the world recognized the now beloved cube. Lakzi lived in Germany at that time, but often visited his homeland, where the object he liked was discovered. In one of the cafes where the entrepreneur was having lunch, he saw a funny little thing in the hands of the waiter. He, as a mathematician and as a businessman in the computer field, immediately saw the prospects and contacted the inventor. Another game inventor, Tom Kremer, who had already founded Seven Town Ltd., was brought in for promotion.
First popularity
And already at the end of the 20th century, hundreds of millions of copies of the Rubik's cube went on sale, making it an exciting game and hobby. The thing spread in European countries in May 1980, and the USSR saw it a year later. Of course, in our country there were some oddities. Some officials were given bribes with these toys, to receive which citizens had to stand in line and go around the circle twice.
The desire to understand the puzzle and learn its secrets enlivened the minds of everyone, even those who did not have it themselves. And in 1982, an article appeared in the famous magazine “Young Technician”, which presented diagrams and methods for making foreign toys with your own hands. And, of course, they could not do without the stigma - a bourgeois toy that takes up a lot of the workers’ time. But these arguments did not exist for long, and soon articles with diagrams for assembling a Rubik’s cube appeared on the pages of scientific journals.
So that people who could not cope with this difficult task and did not drown out their failures in alcoholic binges, special plastic hatchets were developed to destroy the unsuccessful, nasty model.
A little more history

In 1982, the first puzzle assembly competitions were held. The venue was the capital of Hungary - Budapest, where the game was invented. The participants were 19 countries, represented by the best players and winners of local competitions. The winner was Minh Thai, an American student from Los Angeles, who was 16 years old at the time. He completed his task in 22.95 seconds. Although at that time there were persistent rumors about craftsmen who could complete the assembly in just 10 seconds. Of course, compared to Mats Volk's current record, these numbers seem simply huge.
The Dutchman manages this in just 5.5 seconds. Although there is a video where the previous record holder Felix Zemdegs solves the magic cube in 4.21, it has no official confirmation. But there is another record, which is also not officially included in the Guinness Book of Records. The CubeStormer-3 robot managed to beat Zemdegs, spending only 3.25 seconds on the problem. Let's hope that one day one of the people will be able to break the program's record.
Today it is the best-selling toy in the whole world, which everyone has tried to collect. She has several awards to her name: she has repeatedly received the National Hungarian Prize for the best invention, and won in France, the USA, Germany and the UK. In 1981 he received his rightful place in New York, in the Museum of National Art. There is even a special Rubik Foundation, established in 1988. It was founded to support young inventors.
How to solve a Rubik's cube?
Don't rush to put the puzzle on the far shelf. After reading the article, you will be able to understand how to independently go through all the stages of the “cubic” assembly.
Step-by-step diagram and method of assembling a 3x3 Rubik's cube for beginners and children
If you decide to discover the secret to assembling a popular puzzle toy, you should start by studying its internal structure and how the puzzle functions. The cube is sold in office supply stores, supermarkets and shopping centers, and on the shelves in the toy department.
- But out of billions of combinations, it’s unlikely that an adult will be able to find the only solution to this 3D puzzle without devoting a lot of time to studying and assembling it, let alone children.
- After watching enough videos about quickly solving a Rubik's cube, you might think that it's easy. But it's not that simple. So, the first and important step before starting to solve a puzzle is to parse it into individual elements.
- The 3x3 Rubik's Cube is made in the form of a mechanical cube with sides of a strictly defined color.

Each face is structured identically and consists of:
- central segments(one side includes one such segment), capable of rotating around an axis while remaining in “their” cell (in our example, these are the brown central squares on each side)
- 8 corner segments, the square parts of which are painted in three different colors (in the example, such segments are purple)
- 12 ribs, located between the corner segments and having two different colors (in the example these are pale blue squares)
- Rubik's Cube consists of 20 moving parts- these are edges and corners. Knowing how the 12 edges and 8 corner segments can move will help you understand how the puzzle works.

What happens if you rotate one face? The centers are static (do not move), the edges change positions, taking the place of other edges, and the corners move into the corner.
With each shift and rotation of the sides of the cube, the edge remains the edge, and the segment located in the center remains the center.
How to solve a Rubik's cube easily, quickly and correctly: formula, order of assembly, combinations
A completed Rubik's cube means that all the elements are in their “right” places. The reference points for the correct location of the squares are the centers fixed in one place.
- The sides of the rib between the red and green centers are colored red-green. This means that a completed Rubik's cube will have a green edge next to the green central segment, and a red edge next to the red central segment.
- The correct location of the three-color corner is between the centers painted with the corresponding colors.

Stage 1: Edge Assembly
- Let's start assembling the Cube with one color. In our diagram it will be yellow. If you prefer to start with a different color, then simply repeat all the steps with the elements painted in that color.
- Place the cube with the yellow central segment facing up. Then a white center will be placed on the opposite bottom side (standard Rubik's cubes have the same arrangement of colored segments, so the yellow center is always above the white).
- We set all the edges of the color we need around the central square. A yellow cross should form on the top side of the cube.
- But this is done as follows:
the edge, as we have already said, is painted in three different colors, so its second color should correspond to the center that is closer.

Without understanding the structure of the cube, this stage will be difficult to understand. But if you take the time to train (without tips from those who have mastered speed assembly), then everything will work out.
Anyone who sets out to solve a tricky puzzle for the first time usually gives up his idea after folding the cross and one of the sides. They don't have the patience to move forward. But we will continue, because the puzzle is not solved yet!
- So, the main thing for us now is not to give up and try to fold the cross on your own. It’s better to close the article at this time, but if the solution doesn’t come to you, then look at the examples below.
- The diagram below will help you understand how to arrange squares of the same color in a cross. Repeat this step 4 times, because each color must be laid out crosswise.

Start of assembling the cross
How to lay out a cross:
- Flip the puzzle over with the yellow center facing up (if you chose a different color, place the side with the center segment of your chosen color at the top). The white center will be at the bottom.
- We are looking for edges painted yellow on the underside. Let's not forget that the two colors of each edge are important to us now.
- We find the edge painted yellow at the bottom and scroll it so that the yellow square of the edge takes “its place” on the top edge.
Let's do the following:
- The yellow center is pointing down.

Yellow “looks” down
- The yellow center is facing forward.

Yellow “looks” forward
- We place the edge between two intermediate layers.

IMPORTANT: The yellow top edge segment may be oriented incorrectly relative to the other segments, or in the wrong position relative to the nearest center segment.
- To return such an element to the right place, you must move another element to its position.
- The edge will then end up in one of the three positions described above. We install it in the “right” place.
- We assemble each yellow edge in the same way as the diagram above until we get a cross on the top side of the cube.
Stage 2: continuing to assemble the top face:
- After assembling the cross, we continue to assemble the upper side: we move the corners to their places one after another.
- But even here you should collect, adhering to certain rules, and not as your heart desires. The color of each corner depends on the place allocated to it.

There are several ways to get through this stage. Assembling each corner is carried out in 4 steps:

- Turn the cube over with the yellow side up. The white side should be on the bottom. We are looking for a corner on the white side, one square of which is yellow.

Yellow “looks” to the left
- Scroll this “white” layer so that the yellow corner takes “its” place.

Yellow “looks” to the right

- set the cube with a corner element painted yellow to the left
- flip it over, pointing the yellow element to the right
- turn again, pointing the yellow to the underside
IMPORTANT: if there is no yellow corner at the bottom, then it has moved to the top side, which means it has taken a “foreign” position. To return the yellow corner to its place, rotate any corner of the bottom side up. After this, the yellow corner will be at the bottom. Turn until the top layer is completely assembled.
Stage 3: Assembling the second layer
We collect the edges of the second layer. We remember that the centers of the cube do not move and there is no need to move them to find the right place for them. We repeat the steps 4 times. After all, we have 4 edges:
- Place the cube with the white layer facing up. The yellow one, which is below, has already been assembled.
- We find an edge on the top edge, both sides of which are not white.
- We turn the top so that the color of the edge found in the previous step is the same color as the center. We should end up with an inverted T.
- To do this, repeat one of the steps below. You need to find a solution in which the edge took a position on the left or on the right: follow the example that suits you.
Here are the ways to assemble this part of the Rubik's cube:
- We move the edge from the position where it stopped to the right side.

- Move the edge to the left.

IMPORTANT: the absence of an edge, any side of which is not white, means that it has not taken “its” position in the middle layer.
- We move the other edge so that it takes the position of the outermost element in the top layer that took the “foreign” position.
- Now there is no white square on the top edge, which can be scrolled according to the scheme described above.
- We repeat all the steps again 4 times, thus collecting 4 edges.
Stage 4: assembly of the second cross
- We have collected 2 faces. Next, you need to carry out such manipulations, after which the 4 white edges of the upper edge form a cross. Let's focus exclusively on the extreme elements. We shouldn't be interested in angles right now.
- The top layer may have four white edges, two white edges, or no white edges at all. There may be such a position: on the top face there are all 4 white edges. In this case, you can immediately move on to the next stage.
- The version with two white ribs is assembled according to the diagram below. We pay attention to how these ribs are located - next to or opposite each other.
If the white edges are adjacent:

If the white edges are opposite:

White squares are missing in their places:

- It is necessary to perform the above-described manipulations to obtain 2 squares on the top face.
- Next, we fold a cross depending on how the white squares are arranged.
Stage 5: placement of the second cross
- When the second cross is folded, we need to place the sides of the cross so that they become a continuation of the central elements of the faces that match in color.
- Again, we focus solely on the white edges, not taking into account the color of the corner elements.
- We need to rotate the top face so that the color of the two edges matches the color of the central squares of the corresponding faces.
- If only one edge matches, you need to continue rotating.
- Follow the examples above. Here everything depends on the lateral extreme elements: they are located sequentially or are on opposite sides.
If on adjacent edges:

If on opposite edges:

We should now have a correctly positioned second cross.
Stage 6: corners
- Now we proceed to arranging the corner elements of the last layer. The orientation of the corner pieces is not important now. The main thing is to determine whether the corner element is in the correct position.
- This is not difficult to determine: with a correctly positioned corner element, the colors of nearby centers coincide with the color of the 3 squares of the corner.
The following examples will help you understand when a corner element is positioned correctly:

- If the 4 corners are in the correct position, then you can proceed to step 7.
- If only one corner piece is placed correctly, or there is no correctly placed corner at all, then choose one of the appropriate examples to place all the corner pieces in “their” places.
If all three corner parts are not in their “right” places, here are the possible solutions:

Three corners in place (option a)

If there are no correctly positioned corner elements:
- In the latter case, it is necessary to follow one of the examples described above so that at least one corner element takes the desired position.
- After that, continue depending on how the elements are arranged.


Stage 7: Assembly
- The corners have taken their positions, and we have to perform the last steps: solve the puzzle by rotating the corner elements of the last layer.
- Now on a Rubik's cube there may be 2, 3 or 4 corner pieces of the last layer that are oriented incorrectly.
In a situation where 2 corner elements are oriented incorrectly, do the following:
Before rotating the faces of the cube, pay attention to several important points:
- The first option for solving the puzzle may have sub-options. It all depends on which one is right for you. It is necessary to perform the first sequence of actions, and then act in accordance with the result obtained.
Option 1:
- with two incorrectly oriented elements: it is necessary to rotate the “neighboring” corner clockwise.

Option 2-3:
- with three incorrectly oriented corner elements, the Rubik's Cube is solved according to the first example to reach 2 incorrectly oriented corner elements. Further manipulations are carried out based on the results obtained.


Option 4:
- in the absence of correctly oriented corner elements, it is necessary to proceed according to the first example described above, and then select the solution that corresponds to the result obtained.

Assembly option for all incorrectly oriented corners
Are you still following our instructions and everything is done correctly? Our congratulations! Your Rubik's Cube has been solved! And you yourself solved this puzzle!
Video: How to solve a 3x3 Rubik's cube | NEW SCHEME 2017