The harvest of a variety of autumn materials in parks and forests has been carefully collected by our children, which means that it’s time to master new crafts from chestnuts with your own hands. In this article, we are waiting for both familiar and new ones, which can become an excellent fuel for your imagination and creative zeal.
Both children and their parents know that chestnuts can be used to assemble an entire puppet theater. As if in a fairy tale, little people and animals, birds or insects are created by mother’s skillful hands. It is difficult to list all the figures that can be made from chestnuts, matches, and natural materials. Chestnuts for children can become residents of a toy house or an entire toy farm, as opposed to dolls and toys, which sometimes cost a lot of money.
In the picture you see examples of how crafts made from acorns, cones, chestnuts, rowan berries, maple seeds and pine needles make up a whole world of different creatures. There are little men, a donkey with long ears, a hedgehog with pine needles instead of needles, a cow with match horns, even a butterfly and a formidable lion. Everyone is ready to play, ready to bring to life any fairy tale that you can imagine and read for your children.

The popularity of chestnuts is that they are quite easy to work with. Despite the hardness of the shell, it is easily pierced with a needle or awl, which allows you to insert connecting elements such as matches or toothpicks, wire, and thread. The little spider you see in the picture is an ideal craft for the most novice craftsmen. For it you will need a large and beautiful chestnut with a smooth surface and several toothpicks. Using an awl, make eight holes along the bottom edge of the chestnut, four on each side at equal distances from each other. Insert toothpicks into these holes, after first moistening the end that you will insert with glue and pressing it a little so that the glue sets. Thus, insert all eight legs, and then carefully bend each toothpick not all the way so that it bends and the spider is stable. Glue the eyes onto the chestnut tree and you will see how cute your spider is. This craft can be modified and insert not toothpicks, but rough thin twigs and insert two slingshot branches in front. Instead of a spider, you will get a crab.
Crafts from plasticine and chestnuts

In the review of chestnut crafts, the photo of this caterpillar will probably be familiar to you. Indeed, on the Internet, these are the ones that are most popular among all chestnut growers. Why? Maybe because of its simplicity, because the end result pleases literally everyone who takes on this simple but effective craft. All you need is to find several chestnut trees in the park that are similar in size. Chestnuts are connected into a caterpillar using plasticine. You can take regular plasticine, or modeling clay, which hardens over time, in which case your craft will be much more durable. The choice of the color of the plasticine is again yours; it can be one color, or all the links will be multi-colored, which will make the craft brighter. We also sculpt the muzzle and horns for the caterpillar from plasticine.

Another craft that is perfect for a fun game and home puppet theater. You can use colored pencils or cocktail straws as a base for the craft. Using a drill, a hole is made in the chestnut, into which a pencil is inserted. Then you can decorate using colored paper or felt at your discretion. For a pig you will need a snout and ears, for a bird - a beak and wings. Instead of ordinary animals, you can, for example, depict for your child his favorite characters from Angry birds, providing them with characteristic features. If you wish, the chestnuts can be primed and painted, then the resemblance to the original will be simply perfect.

The chestnut caterpillar was our first difficult one, i.e. a composite craft made from several chestnuts. To create this charming dog, the same technique was used, that is, several chestnuts are held together using plasticine. In this case, we need two chestnuts, and you must carefully select them in shape, since both of them should be more elongated than round. One, the larger one, will be used for the torso, and the smaller one will be used for the head. They are fastened together using plasticine. Small round legs, long ears and a thin tail bent into a donut are made from plasticine. All that remains is to use plasticine to “draw” the dog’s face, add a red tongue stuck in and enjoy playing with your new friend, Kashtanka.
Autumn crafts from chestnuts

For everyone, autumn gives rise to its own associations, for some it is birds flying away to warmer climes, falling leaves or cool rain. And our autumn chestnut crafts will be dedicated to quiet hunting, the time of mushroom picking. These charming mushrooms are made from acorns and chestnuts. Plasticine for crafts, as you can see in the photo, is not one color, but is a mixture of colors. The green pillow, which depicts green grass, looks especially beautiful. You need to stick two strong, large acorns into this base. By pressing them well into the plasticine, you will provide your craft with the necessary strength. Apply a ball of plasticine to the tops of the acorns and place the chestnuts on top. With a slight movement of a hooligan hand, our butter mushrooms will easily turn into fly agaric mushrooms if you stick several balls of white plasticine on the “hats”. Our composition will be completed by the needles at the base of the mushrooms, which will depict grass, and the bright rowan berries, adding red color accents to any.

A hedgehog with chestnut needles, sitting so comfortably on a heap of autumn leaves, also evokes warm associations with autumn. To complete this craft, you will need a frame made of foam or packaging material that is rolled up or cut into a cone. Next, this cone must be wrapped in corrugated paper, in our case brown. Glue the edges carefully so that the paper does not form unsightly folds. Now that the hedgehog’s body is ready, let’s start decorating it with chestnuts. The most convenient way to do this is with a glue gun or use Moment glue. Cover the entire surface except the pointed area of the muzzle. A nose for a hedgehog can be made perfectly from an ordinary kitchen sponge, which needs to be soaked in black paint. A ball is cut out of an already dried sponge, which is glued to the tip of the nose. Glue two black beads and the hedgehog's face will be ready. All that remains is to build a stand for it, because these are crafts made from chestnuts and leaves. To do this, cut out a circle from yellow craft cardboard and cover it with yellow maple leaves that you bring from your walk. Plant the hedgehog on these leaves, decorate the top with rowan berries and hedgehog supplies for the winter.

Continuing to combine chestnuts with natural materials, we suggest trying to make bunnies from chestnuts. For each such bunny you will need two chestnuts, thin cuts of a branch. You can fasten the chestnuts together either with plasticine or with toothpicks. In this case, a hole is made in one chestnut, and a toothpick is stuck in the other so that the parts can be easily connected to each other and securely fixed. Make the cuts of the branch flat on one side, where they will stick to the surface of the chestnut. The bunny's eyes can be made from foam balls, and the muzzle from the core of a faded tea rose.
DIY crafts from chestnuts and acorns
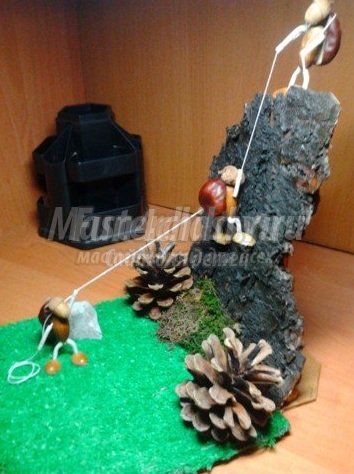
We have already touched on the topic of crafts from chestnuts and acorns when we made mushrooms. Now before you is an epic canvas from the life of climbers.

DIY crafts from cones and chestnuts

Crafts made from cones and chestnuts will look much more impressive if you cover them with paint from an aerosol can. This applique of chestnuts, coated with silver paint and placed under glass, will become a decoration for any interior.

Our review will be completed by a small collection of chestnut topiaries. As a base, you can use either a cardboard cone, or foam, or a paper cone filled with crumpled paper. Covering a cone with chestnuts does not mean making it festive. It will become truly New Year's if you decorate it with shiny tinsel. It needs to be carefully pushed between the chestnuts using a pencil. This will add shine and cover all the empty spaces in the topiary. You can make a variation on the theme and wrap some chestnuts in colored candy foil before gluing. An abundance of multi-colored chestnuts will greatly decorate our craft, but you can also add a few small Christmas tree decorations, stars, and put a Christmas tree top on the sharp edge of the cone.
Key news tags: ,
Other news
Chestnut fruits, if you have imagination, plasticine and twigs, make very interesting crafts. They can be done together with children, just for kids, because there is nothing complicated here. The main thing is to collect them in time in the fall, while they are still soft, and save them for creativity. Picturesque crafts will decorate not only a shelf in a child’s closet, but are also suitable for exhibitions in a kindergarten or classroom.
Together with your kids you can try to make animals such as a spider, a hedgehog, a bear. Children can easily create a Cheburashka or a caterpillar, and together with their mother it is very easy to build a house or decorate a topiary. You just need to prepare scissors, glue, plasticine, the rest will depend on your skills and imagination.
Caterpillar made of plasticine and chestnuts
You need to take:
- several chestnuts, for example 7 pieces
- colored plasticine
- matches

It's easy to make a funny caterpillar:
- We connect even fruits using plasticine; for reliability, you can fasten them with matches
- We sculpt eyes, nose and mouth, you can make them in any color
- We stick horns from toothpick halves with plasticine balls at the ends into the head
To make the caterpillar even more interesting, you can place it on the leaves or add tree branches to the composition.
Toothpick Spider
All you need is toothpicks and one large, evenly shaped fruit:

- Take 8 toothpicks, break them slightly in the middle, stick them into the body of the spider
- Eyes can be made from plasticine
Ant made from chestnuts and straws
You need to prepare:
- 2 smaller chestnuts for the body, one larger for the head
- plasticine
- plastic cocktail straws

To make an ant, you need:
- Connect the head and body with plasticine, sculpt the eyes and mouth
- Cut the straws for the paws, it is better to do this from the bendable side of the straw
- Stick them in the torso
The ant turns out even more beautiful if you add small antennae to it and select elongated fruits for the body.
Cheburashka with big ears
Making Cheburashka is simple, you just need to prepare toothpicks and fruits of different shapes

- We connect the stomach, head and ears with halves of toothpicks, make arms and legs
- You can use a felt-tip pen to draw eyes and a smile on your face.
Chestnut bear
You need to prepare:
- 2 chestnuts, more for the stomach, less for the head
- brown plasticine for paws

We fasten the head and stomach with plasticine; we also need to make paws and ears from plasticine balls. Add the nose and eyes.
Chestnut beads
Little fashionistas will like making such simple beads:
- Prepare a strong fishing line of the required length
- Make a hole in each small fruit with an awl so that you can thread a fishing line through it
- Collect beads, optionally complementing them with colored beads

Decorated vase
You need to make such a vase with adults.
You will need:
- many small even fruits of the same size
- tall canned fruit tin
- paint of any color in a can, you can take gold or silver

The vase is simple to make:
- The jar is pasted over the entire length with fruits, you can make the rows even or at a diagonal angle
- The resulting voluminous vase dries until the glue hardens
- The finished product must be coated with spray paint.
This vase looks good with dried flowers and tree branches.
Flowers of their acorns
You need to prepare:
- more acorns for the petals
- chestnuts for the flower core
- long branches for the stem

Making flowers is easy:
- Glue the acorns to the centers using chamomile glue
- We stick sticks into the finished flowers
Chestnut tree in the painting
Have to take:
- a lot of fruits
- cardboard for background
- spray paint
The panel is made like this:
- Cut out a tree silhouette from cardboard
- Glue the fruits onto the cardboard with glue. The larger ones will go to the trunk, and the smaller ones to the branches.
- We paint the wood and dry it
- Glue the craft to a fabric panel or photo frame
House decorated with chestnut fruits
Anyone can make a house. You will need:
- 2 liter juice boxes for the walls of the house
- roof box cut at an angle
- dry leaves, twigs
- scissors, glue
- chestnuts

To make a craft house, you need:
- glue the boxes, cut out windows and doors in them, glue the roof
- cover the roof with leaves, imitating tiles
- decorate doors and windows with branches
- coat the entire house with glue, attach chestnuts to the walls, imitating stonework
Hedgehog made from chestnuts and a plastic bottle
You will need:
- plastic bottle
- plasticine to make a hedgehog's face
- a lot of chestnut fruits
- twigs and leaves for decorating crafts

The hedgehog is made quickly:
- We pour dry sand into the bottle for balance and stability.
- Coat the lid and the beginning of the bottle with brown plasticine, this will be the face of a hedgehog
- We make a black nose and eyes from white plasticine
- Glue the oblong chestnut fruits with glue, the larger they are, the fluffier the hedgehog will be
- You can paint the tips of the “needles” with white paint
The hedgehog turns out to be very beautiful; to be authentic, you need to decorate it with leaves and berries.
Topiary of flat chestnuts
You need to prepare:
- flat-shaped chestnuts - topiary from them turns out more beautiful
- pot
- a thick branch for the trunk
- foam ball for the crown of the topiary, if not, you can make a lump of newspapers, tie them with threads
- threads, ribbons, moss for decoration

Topiary is done like this:
- Stick a branch into a ball of foam or newspaper
- Place the branch in a pot without holes, fill it with a mixture of gypsum to fix it
- We cover a regular plastic pot with rope or gray twine for beauty.
- Glue the fruits to the ball around the entire circumference with a glue gun, trying to leave only small gaps
Decorating the almost finished topiary:
- The top of the plaster should be decorated with small pebbles and sealed with pieces of thread
- It is recommended to make a bow from a piece of ribbon under the ball; you can decorate the topiary with paper flowers or butterflies
All these crafts will delight you for a long time, reminding you of autumn walks.
Autumn crafts from chestnuts for kindergarten should be simple, but interesting. We bring to your attention just such - with a little help from teachers, children can easily make original toys - a giraffe, a deer and/or a horse. Or maybe, based on the general idea, you can make a goat or a calf? Who will the kids choose?
And if in kindergarten they were assigned to make a craft from chestnuts at home, parents will primarily like this master class because the work on it can be completed quickly!
So, to make such crafts for kindergarten from chestnuts, as in our photos, you will need:
4 small chestnuts and 2 larger ones;
5-6 toothpicks depending on the “style” of the animal;
a little plasticine.
Crafts from chestnuts for kindergarten: job description
It is best to work with fresh, just picked chestnuts. They have a shell that is elastic enough to be easily pierced with a toothpick. If you plan to work with natural materials, but the chestnuts are not pierced well, this is easy to fix: using an awl, an adult can make holes in the drying chestnuts, and children can connect the chestnuts using toothpicks.
The basis of the animal
For the body, choose the largest chestnut. We stick 4 toothpicks into it - if they stick themselves, then without outside help; and if not, then first make holes with an awl, and then insert toothpicks into them.


Then a hole is made for the toothpick neck. In order for a chestnut craft to stand steadily, it is important not to upset the balance. There is no need to place the “neck” as close to the edge as possible, otherwise the animal will constantly fall forward.

Place a chestnut head on the second part of the toothpick. Don’t forget about balance and stick it not to the edge, but a little closer to the center.

Let's check how stable our autumn craft for kindergarten is.

If everything is fine, then we move on. If not, then we help the children move the chestnuts and toothpick so that the toy stands. Also pay attention to the toothpick legs: maybe you can find a better, more stable position for them?
For the feet, or rather, hooves, we choose the smallest chestnuts. The most suitable option is “paired” chestnuts, in which one part is flat. But if there are none, it doesn’t matter. Any small ones will do just fine.
The main thing here is to arrange them so that they all fit on the toothpick legs, so that they are not cramped, and yes, so that the toy remains stable.

We made three figures at once. Let's see what we can turn them into?

Craft giraffe from chestnuts for kindergarten
The long toothpick neck directly hints at turning one piece into a giraffe. Let's not resist. Let's take more toothpicks and break them in half: half of one will turn into a tail, and two halves of the other will turn into blanks for horns.

You will also need plasticine parts: a thin yellow rope, 6-8 small yellow balls, 2 very tiny ones and 2 larger balls; made of white plasticine - 2 medium-sized balls for the eyes and 2 small black ones for the pupils.
Let's start with the eyes. Flatten the white balls in the place of the head where the eyes should be.

Let's add black pupils.

The smallest yellow balls are the nostrils. Let's glue them in place.

Place large yellow balls on the tips of the toothpick horns.

The rest of the yellow balls will be flattened over the giraffe’s body - after all, it must be spotted!

We cut or tear the tourniquet into small pieces and wrap them around the tip of the toothpick-tail, forming a tassel.

The giraffe is ready.


Deer
What will you need to make a deer?

- a toothpick broken in half;
- 2 larger white plasticine balls and 2 small black balls for the eyes;
- long thin white plasticine rope;
- 2 shaped and flattened sausages, pointed on both sides (ears);
- tail: a piece of plasticine rolled into a sausage, then flattened, bent in a slight arc and “drawn” with a stack to imitate wool.

In the same way as for the giraffe, we make the eyes: first we flatten the white balls, and on top - black ones.

We insert the toothpick horns so that they look well in different directions.

Glue on the ears.

Tail queue.

We tear or cut the plasticine rope into small pieces and form horns-twigs from them (here you will need the help of teachers or parents).

The deer is ready.


Horse
The horse is very easy to make.

To assemble it, we sculpt the following parts from plasticine:
- 2 white balls for eyes;
- 2 black balls for eyes;
- 2 short sausages, pointed on both sides and then flattened (ears);
- several long thick sausages.
We glue the eyes and ears in a way that is already familiar to you.

We cut or tear the sausages into small fragments - this will be the mane. We place it between the ears along the body of the chestnut head.

Then we cut several longer sausages and glue them into a bundle, and only then glue it in place for the tail.

And a few more photos of our cheerful hoofed company. I think the kids will definitely like these autumn chestnut crafts for kindergarten!


Eva Casio specially for the site
Useful tips
You can make various crafts from chestnuts, and they work especially well when using plasticine along with chestnuts.
In addition, there are other natural materials, together with which various compositions, insects and animals can be made from chestnut.
On our website you will also find:
Here are some of the most interesting chestnut crafts:
DIY chestnut crafts: snail

You will need:
Plasticine
Plastic knife.
1. Roll a “sausage” out of plasticine.
2. Cut the tip of the sausage in half with a plastic knife - these will be the snail's horns.

3. Press down the rest of the sausage and place a chestnut on it - this will be the snail’s house.

4. Make eyes for the snail out of plasticine and attach them.

Crafts from acorns and chestnuts: mushroom
There are two ways to make a mushroom from acorns and chestnuts - a simpler one and a little more complicated.
Method 1.

You will need:
Plasticine.
1. Using plasticine, connect the acorn and chestnut as shown in the image.
2. Make several small “cakes” from plasticine and attach them to the cap of your mushroom to make a fly agaric.

3. Make a large green cake out of plasticine - this will be a clearing for the mushroom.
4. Place the mushroom in the clearing and you can decorate your work with a sprig of rowan and Christmas tree needles.
Method 2.

You will need:
Plasticine
Plastic knife or match.
1. Make a small cake and use a plastic knife or match to draw a small texture on it (make many small holes).
2. Attach the acorn to the plasticine and you're done.
You can make a clearing as in method 1.
DIY chestnut crafts for children: insects
Acorn caterpillar. Option 1.

You will need:
Chestnuts
Plasticine
1. Prepare several chestnuts of approximately the same size. Their number will depend on how long the track you want to make.
2. Use plasticine to connect all the chestnuts.
3. Mold the eyes, nose and mouth of the caterpillar from plasticine.
4. Take the largest chestnut tree and attach all the details of the caterpillar's face to its light part.
5. Attach the head to the caterpillar and attach the horns (matches).
How to make a caterpillar from acorns. Option 2.

You will need:
Chestnuts (preferably 1 large chestnut for the head)
Strong thread (line) and needle
Felt pen (for "face")
Toy eyes (optional)
Hammer
Pliers
A tin lid or small board (so you can drive a nail into the chestnut).

1. Use a hammer and nail to punch holes in your chestnuts.
2. Take a large chestnut, which will act as a face, and make a hole on the side (turning the light part of it on its side).

3. Now pass a strong thread or fishing line through all the chestnuts and tie a knot, both at the beginning and at the end.

4. Use a marker to draw eyes, a nose and a mouth on the large chestnut tree.

Crafts from chestnuts for kindergarten: chestnut spider

You will need:
One big chestnut
Plasticine
Super glue
Toothpicks
Acorn hats (optional).
The chestnut will be the body of your spider, and you need to attach toothpicks to it, which act as legs.
1. Prepare 8 toothpicks and break them in the middle.
2. Use super glue to secure the toothpicks to the chestnut as shown in the image.
If necessary, you can fix the spider's legs with plasticine.
3. Make spider eyes out of plasticine and attach them to the chestnut tree.

* You can also make eyes from acorn hats, inside which you need to attach small pieces of plasticine that will act as pupils.
* You can also use an acorn cap to make a headdress for a spider.
* Instead of toothpicks, you can use wire, which you can cover with a thin layer of plasticine.
Crafts from chestnuts for children: owl

You will need:
PVA glue, super glue or hot glue
Acorn caps
Felt-tip pen or plasticine (for the pupils).
1. Cut out the wings, legs and beak of an owl from felt and glue them to the chestnut.
2. Glue two acorn caps to the chestnut. You can insert a piece of plasticine into each hat to make a pupil, or simply draw eyes with a felt-tip pen.
Crafts from chestnuts on the theme "Autumn": beads

You will need:
Chestnuts
Colored beads
An awl or nail and a hammer.
1. Use an awl to make holes in each chestnut.
2. Start stringing the chestnuts onto the fishing line, inserting one colored bead between them. At the end, tie the fishing line in a knot.
Autumn crafts from chestnuts: God's eye (Ojo de Dios - Mexican craft)

The arrival of autumn brings an abundance of natural materials: chestnuts, leaves, acorns, plant seeds, chestnut peels.
What can you make with your own hands from chestnuts on the theme of autumn for kindergarten or school?
What crafts from chestnuts should I prepare for the autumn holiday? Where can I find videos and photos on making crafts from chestnuts?
The most famous and simple crafts: caterpillar, Cheburashka, mushrooms, bear cub, hedgehog.
Among the little known, but not requiring special time and material costs: snail, horse, dog, fox, turtle, bird, spider, beetle, hare, butterfly, dragon, heart, beads, bracelets, capitoshka, snowman, house, basket, monkey , cat.
Let's look at each craft in detail, from the selected materials to the finished product.

Necessary for making: chestnuts - 4 large, 3 small, matches or toothpicks, plasticine, marker, paper knife, hole needle or awl, corrector if there is no permanent marker.
- We lay out the prepared tools and materials and select the largest chestnuts - the body and the head - 2 pieces. We lay out the Cheburashka on the table to see how it will look when finished. If necessary, we replace unsuitable chestnuts.
- We assemble the head by first making 2 holes in the chestnut head using a large needle or an ear awl. Before making a hole, try on what your Cheburashka will look like.
- Insert toothpicks or matches into the finished holes, slightly sharpening them at the ends. We perform similar operations with the ears. We choose chestnuts that are flatter on one side for the ears. We attach them to the head, securing them with toothpicks.
- We select a second large chestnut and use toothpicks to attach the head to the body in the same way.
- The arms are small chestnuts attached to the body with toothpicks.
- The legs are small chestnuts cut in half, if there are flat chestnuts left, then those will do.
How to draw a face?
Let's look at 3 ways:
We draw the muzzle in the place where it is slightly rough and differs in color from the main smooth dark brown color. Draw eyes, nose and mouth with a waterproof marker.
Using a corrector and a marker, or for black we use plasticine. Draw the eyes, mouth and nose in the same way.
Use a needle or awl to make holes or cut out the mouth, nose and eyes with a knife.
If you have eyes from toys or you bought them and they fit, you can make them from a package of tablets if you wish.
The Cheburashka is ready, check that it stands firmly on the surface; if it cannot boast of such an ability, it is worth redoing the legs.
In this training video you will see how to make a craft for Cheburashka and other heroes.
How to make a mouse from chestnuts?

Necessary for making a mouse: chestnuts - 4 large, 3 small, matches or toothpicks, plasticine, marker, paper knife, hole needle or awl, corrector if there is no permanent marker.


This is the mouse we got, look at the photo.
Teddy bear or chestnut bear

In this photo, you see 4 versions of chestnut bears using plasticine and acorns. Ideas for creating such variants of crafts will be very useful for creating a composition or a ready-made craft. All that remains is to make a tree and the clearing itself or a platform for the bear, and maybe a den. The tree can be a cone or a leaf from a maple, oak, or chestnut.
It is done in the same way as a mouse, only we use small chestnuts for the ears, as well as for the legs and arms.
We will need: chestnuts - 2 large, 6 small, matches or toothpicks, plasticine, marker, paper knife, needle for holes or awl (nail file), corrector, if not, permanent marker. 
We carry out similar operations as in creating the Cheburashka craft, only we attach the ears to the top of the head. We make the nose from black plasticine and finish the mouth with a black marker.
If there are no small chestnuts, we make these parts from plasticine, the second option is in the photo of the teddy bear.

How to make mushrooms from chestnuts?
We will need: chestnuts according to the number of mushrooms, a knife for cutting paper.
- Carefully cut off some of the brown skin of the chestnut, giving the top part the shape of a mushroom cap.

- Shape the white inside of the chestnut into the shape of a mushroom stalk, choose the shape that you like best.
- The mushroom is ready, now all that remains is to place it in your clearing next to other heroes.

A detailed master class on cutting a chestnut mushroom is shown in this video with step-by-step explanations - Prepare: chestnut, peel with needles, plasticine, scissors with curved ends.
- We attach a nose made of gray plasticine to the chestnut and 4 legs underneath.
- We spread a fairly thick layer of plasticine on top, making cuts on it with scissors with curved ends.
- Attach a small ponytail if desired.
- Place a mushroom or a small apple on the needles.
- Choose a chestnut of the correct shape so that by cutting off the chestnut peel and the chestnut itself you can easily get an elongated spout.
- If there is no such chestnut, mold a nose out of plasticine and make eyes and a mouth using a needle or marker.
- Make 4 legs from plasticine in the shape of columns or attach bent sausages to the hedgehog’s tummy and a tail.
- We attach the chestnuts to each other and the peel using: a glue gun, toothpicks or plasticine.
- The second chestnut has a peel; there will be no need to attach it if you did not remove the chestnut from it. The peel should be made of 2 halves and diverging towards one of the ends - these are the wings of our beetle.
- The head must be supplemented with mustaches made from twigs by gluing or inserting into the punctured holes. Draw eyes and a mouth on your beetle using a marker, varnish or a corrector.
- If you only have PVA and paints, then add paints to it and paint the head of your beetle with it.
- Choose one chestnut slightly smaller in size than the second, this is the head and body of our cat.
- Connect to each other using a plasticine cake.
- Then we sculpt the ears - these are 2 triangles. The eyes are 2 white circles, with black dots or stripes in the middle, the tail is a sausage.
- We fasten the cat by attaching plasticine to chestnuts. A smaller chestnut with a larger one, replacing the ears, eyes and tail.
- The muzzle is 2 circles connected together and on top there is a pink dot - the nose. Be sure to use paste or a needle to put dots on the muzzle and add a mustache from a fishing line by simply sticking it in.
- We sculpt the paws into a sausage and 4 fingers for each. For our cat, 2x will be enough, because... he's sitting.
- Under the 2nd lower chestnut we make only a foot, a sausage and 4 fingers, we attach everything to the chestnuts.
- The cat is ready, all that remains is to make him a bowl or sausage to give the image a reality.
Secret: for a short leg, cut a mushroom from the top of the chestnut; for a long leg, make a cap from the side of the chestnut.
A more detailed master class is shown in the video lesson on cutting mushrooms from chestnuts.
Method 2: mushrooms with plasticine
If you want to get collapsible mushrooms, then use method 2.
We cut out a mushroom cap from the chestnut or use a suitable chestnut shape, with one side flat and the other convex.
We sculpt a mushroom stem from plasticine and stick yellow plasticine onto the lower part of the mushroom cap, exactly matching the shape of the cap.
Using a needle, we make a large number of small holes, like butterfish.
We attach the leg to the chestnut using plasticine or toothpicks.
The mushroom is ready.
Caterpillar or centipede

The simplest craft, it will suit even 3 year olds.
The number of chestnuts is the same as the length of your caterpillar. We fasten them together with plasticine or toothpicks, first threading holes.
Draw a muzzle and insert antennae from toothpicks or sticks.
For older children, we sculpt legs and arms together with them.
Chestnut hedgehog - 4 options

With mushroom
Hedgehog made from chestnut peel

From green chestnuts
To create a hedgehog craft, we need: chestnut peel, a chestnut or slightly greenish chestnut already in the peel, a marker and plasticine.
The hedgehog is standing
For those who want to make a hedgehog standing on its hind legs, we use similar materials, just think about how or by what means it will be attached to a table or other flat object.
Snails

We sculpt snails from colored plasticine. We roll the sausages and make them thinner at the end, and divide the second into 2 parts to make thin horns.
And the houses are our chestnut trees. You can paint them in circles or not as you wish. This family is easy to make in a few minutes.
Basket
We cut a basket out of a large chestnut tree, suitable for crafts for the garden or school, to put tiny mushrooms.
The second option is to glue the chestnuts into a basket shape; it is better to attach the chestnuts to each other with a hot gun or instant glue. Use pine cones or other natural materials for decoration.
2 variants of chestnut turtles
Required: chestnut peel with cut needles, plasticine, scissors.
Armor
We cover the prepared peel from half of the chestnut together with the chestnut itself with green specks of plasticine, or use scissors to make oval rounds if there is only one chestnut.
We trim only the brown peel with scissors with curved ends.
Head
We roll a medium-thick plasticine sausage, bend one side of it and thicken it a little, giving it the shape of a turtle’s head.
Slightly flattening it on the edge, if the neck is very long, remove the piece of sausage.
Using a toothpick or a needle, make eyes and a mouth on the head. Option 2: We make the eyes from white with black or green plasticine.
We attach the head to the body, pressing on the chestnut itself from the back side, where the legs are.
Turtle legs
These can be plasticine barrels made from thickened sausages. We need to form 4 of these identical ones. For the turtle to stand, check the soles, they must be level.
Using a needle or toothpick, draw the turtle's fingers; if you have cumin, use them to make nails.
Tail
We make the tail from plasticine. Roll out the sausage and thin it towards the end.
We attach the legs, head and tail molded from plasticine to the body. If they do not hold well, then use toothpicks for better fastening or a hot gun, then the turtle will turn out to be non-separable.
If there is not enough plasticine, but there are a lot of chestnuts, then we make a turtle from chestnuts like this:
We scratch the shell on the chestnut using a compass or any other sharp object.
We make legs from other small chestnuts or cut them out of chestnuts.
Bug
Required materials: 2 chestnuts, chestnut peel without needles, marker or varnish, sticks for mustaches and legs.
How to make a cat
You will need: chestnuts, plasticine, a modeling board and paste or a needle, a little bit of fishing line for a mustache.
What other animals or insects are easy to make from chestnuts?
Spider
Horses
Dog
Fox
Bird
Hare
Little people
Gluttons or alien creatures
Elephant
Pigs
ladybugs
House
Beads
Bracelet
What autumn-themed chestnut crafts can be made for the garden and school? (photo)

Come up with a plot. For example: from the cartoon Winnie the Pooh, Owl and Piglet are picking mushrooms in a clearing, 3 little pigs are hiding in a house of chestnuts from an evil wolf, a hedgehog is collecting mushrooms and apples in a clearing, Fly Tskotukha and the Villain Spider. Remember fairy tales or cartoons about autumn and heroes, it will be much easier for you to create a picture.
For the finished heroes, all that remains is to make a clearing, a house or other decorations. Often in kindergartens or schools they suggest plots or main characters.
Use the following natural materials to create crafts: acorns, leaves, rowan, sticks.
It’s easy to create an entire kindergarten or school out of chestnut little men at the blackboard and at their desks. If you want to fantasize without limits, then flying saucers with gluttons are perfect for this!
For school, make a clearing with mushrooms or an autumn forest from leaves, cones, chestnuts.
What crafts to make from chestnuts for the autumn holiday with your own hands?
How to imagine autumn? Collect leaves, twigs, chestnuts and acorns. Come up with a composition, for example, a house and a clearing.
The hedgehogs’ house (description above) and the hedgehog family itself in the clearing. Make hedgehogs as described in the article, adding rowan berries to their needles.
Bears or other forest dwellers can also live in this house.
Craft planet in autumn
Find polystyrene foam in the shape of a hemisphere and cover it with leaves and decorate with twigs. Add other gifts of autumn: acorns, rowan berries, nuts, chestnuts and pine cones. Call the craft “Autumn has come to the planet” and come up with a story or take a poem about autumn. The following videos show options for crafts for kindergarten and school, watch and take note of interesting ideas.
We hope that it will become much easier for you to make crafts from chestnuts after reading our article and watching video tutorials. It's time to start creating crafts from chestnuts; we wish you good luck in such an interesting and creative process.