I would like to consider such Japanese art as amigurumi. Literally translated, this means “knitted-wrapped.” Toys made using this technique can be small in size, about 5 centimeters, and can be worn in the form of keychains, or large in size, and can be an element of your interior decor. Products can be made either by knitting or crocheting. Two knitting techniques can be distinguished: in circles, which is a European variety, and in spirals, a Japanese technique. These can be toys in the form of animals, or in the form of little men, or in the form of household items: hats, handbags, etc. A pattern and description for crocheting a cute dog is included in our article.
To knit our first toy, you need to have a not too large set of materials.
Crochet a dog: diagram and description of work for beginners
For work we will need:- White yarn;
- Some black yarn;
- Some blue yarn;
- Some yellow yarn;
- Hook;
- Eyes;
- Filler;
- Scissors;
- Needle.
I think it's time to get started! So let's start crocheting the dog's head.
Step #1: Heads.
We take white yarn.
Row 7: 5 hundred without Na + 1 increase, repeat 6 times. We get 42 P.
Row 8: 6 hundred without Na + 1 increase, repeat 6 times. We get 48 P.
Row 9: 7 hundred without Na + 1 increase, repeat 6 times. We get 54 P.
10-13 row: 54 hundred without Na. We get 54 loops.
Row 14: 8 hundred without Na + 1 increase, repeat 6 times. We get 60 P.
15-16 row: 60 sts without Na. We get 60 P.
Row 17: 1 decrease + 8 stitches without Na, repeat 6 times. We get 54 loops.
Rows 18-21: 54 hundred without Na. We get 54 loops.
Row 22: 1 decrease + 7 stitches without Na, repeat 6 times. We get 48 loops.
Row 23: 1 decrease + 6 stitches without Na, repeat 6 times. We get 42 loops.
Row 24: 1 decrease + 5 stitches without Na, repeat 6 times. We get 36 loops.
Row 25: 1 decrease + 4 stitches without Na, repeat 6 times. We get 30 loops.
Row 26: 1 decrease + 3 stitches without Na, repeat 6 times. We get 24 loops.
If you have safety eyes, then attach them between rows 15 and 16.
Row 27: 1 decrease + 2 stitches without Na, repeat 6 times. We get 18 loops.
Row 28: 1 decrease + 1 st without Na, repeat 6 times. We get 12 loops.
Row 29: 6 decreases. We get 6 P.
This is where the head knitting ends. Don't forget to leave a long thread so that you can sew the head to the body of the toy.
Step #2: Muzzle.
Now I will describe how to make the dog have a muzzle.
We take white yarn.
1st row: 6 sts without Nav amigurumi ring. We get 6 P.
2nd row: 6 increases. We get 12 P.
Row 3: 1 st without Na + 1 increase, repeat 6 times. We get 18 P.
Row 4: 2 hundred without Na + 1 increase, repeat 6 times. We get 24 loops.
5-8 row: 24 hundred without Na. We get 24 loops.
When finished, do not forget to leave the thread.
Step No. 3: Ears – 2 parts.
We take white yarn.
1st row: 6 sts without Na in amigurumi ring. We get 6 P.
2nd row: 6 increases. We get 12 P.
Row 3: 1 st without Na + 1 increase, repeat 6 times. We get 18 P.
Row 4: 2 hundred without Na + 1 increase, repeat 6 times. We get 24 loops.
5-6 row: 24 hundred without Na. We get 24 loops.
Row 7: 2 hundred without Na + 1 decrease, repeat 6 times. We get 18 P.
Rows 8-15: 18 stitches without Na. We get 18 P.
Row 16: 2 hundred without Na + 1 decrease, repeat 4 times. We get 14 P.
Filling the ears.
Finish and leave the thread.
Step #4: Torso.
Let's start knitting the body of our animal.
We take white yarn.
1st row: 6 sts without Na in amigurumi ring. We get 6 P.
2nd row: 6 increases. We get 12 P.
Row 3: 1 st without Na + 1 increase, repeat 6 times. We get 18 P.
Row 4: 2 hundred without Na + 1 increase, repeat 6 times. We get 24 loops.
Row 5: 3 hundred without Na + 1 increase, repeat 6 times. We get 30 P.
Row 6: 4 hundred without Na + 1 increase, repeat 6 times. We get 36 P.
Rows 7-15: 36 stitches without Na. We get 36 P.
Row 16: 5 hundred without Na + 1 increase, repeat 6 times. We get 42 P.
17-19 row: 42 hundred without Na. We get 42 loops.
Row 20: 1 decrease + 5 stitches without Na, repeat 6 times. We get 36 loops.
Row 21: 1 decrease + 4 stitches without Na, repeat 6 times. We get 30 loops.
Row 22: 1 decrease + 3 stitches without Na, repeat 6 times. We get 24 loops.
Row 23: 1 decrease + 2 stitches without Na, repeat 6 times. We get 18 loops.
Let's start filling.
Row 24: 1 decrease + 1 st without Na, repeat 6 times. We get 12 loops.
Row 25: 6 decreases. We get 6 P.
Finish and leave the thread.
Step #5: front paws.
Does the dog need something to run on? Let's start knitting paws
We take white yarn.
1st row: 6 sts without Na in amigurumi ring. We get 6 P.
2nd row: 6 increases. We get 12 P.
Row 3: 1 st without Na + 1 increase, repeat 6 times. We get 18 P.
Row 8: 1 decrease + 1 stitch without Na, repeat 6 times. We get 12 P.
Rows 9-18: 12 stitches without Na. We get 12 P.
Finish and leave the thread.
We fill in the detail.
Step #6: Hind legs.
It's the turn of the back pair of legs.
We take white yarn.
1st row: 6 sts without Na in amigurumi ring. We get 6 P.
2nd row: 6 increases. We get 12 P.
Row 3: 1 st without Na + 1 increase, repeat 6 times. We get 18 P.
Rows 4-7: 18 stitches without Na. We get 18 P.
Row 8: 1 decrease + 1 stitch without Na, repeat 6 times. We get 12 P
We fill in the detail.
Row 9: 12 stitches without Na. We get 12 P.
Row 10: 1 st without Na + 1 increase, repeat 6 times. We get 18 P.
Rows 11-14: 18 stitches without Na. We get 18 P.
Row 15: 1 decrease + 1 stitch without Na, repeat 6 times. We get 12 P.
Row 16: 6 decreases. We get 6 P.
Finish and leave the thread.
Step #7: Tail.
What's a dog without a tail? You have to wiggle something!
We take white yarn.
1st row: 4 hundred without Na in the amigurumi ring. We get 4 loops.
2nd row: 4 increases. We get 8 P.
Rows 3-12: 8 stitches without Na. We get 8 P.
Finish and leave the thread.
Step #8: Nose.
We take black yarn.
1st row: 8 stitches without Na in amigurumi ring.
Finish, leave the thread.

Step #9: Collar.
And of course, a decent pet must have a collar.
Take blue yarn.
3 air loops.
1st row: 2 hundred without Na + 1 chain loop, turn.
We continue knitting until the collar fits in size.
Step #10: Tag.
Take yellow yarn.
1st row: 6 sts without Na in amigurumi ring. 
Step #11: Assembly.
We sew all the details looking at the photo. We try to do this as carefully as possible, since careless work will bring careless results.
Now that the dog is ready, we can admire the result, and if you want to continue and get a little inspiration, then you can also look at other works made using the amigurumi technique.

In conclusion, I would like to write that with a little imagination, you can, as always, get a result that will exceed all your expectations. You can experiment with this technique with size, shape, and color. This art wins the hearts of many people because the toys turn out to be very cute, with big cute eyes that enchant you with their beauty. This happens because the typical structure of toys is a spherical head and a cylindrical body with small limbs - arms and legs... In order to make it easier for you when you begin to consolidate this master class with practice, I would like to invite you to watch a video on the topic.
Video selection on the topic of the article
Knitting is coming back into fashion, and this is not surprising: isn’t it wonderful when skilled craftswomen, with a skein of thread and a hook, create simply amazing masterpieces? Take, for example, dog toys, the diagrams and descriptions of which you will find in the article.
soft friend
A homemade toy always has many advantages, ranging from personal preferences to the quality of the products included in the composition. This is an excellent solution for allergy sufferers who are highly sensitive to a variety of synthetic odors. In addition, such homemade animals are several times cheaper than purchased options.
So, today our hero will be a knitted one, which we will analyze in detail. We will pay great attention to all the details, difficulties and features of the work so that this lesson is clear even for beginners.
For worry-free work

To begin the knitting process, you need to prepare the necessary materials. Since this is, first of all, a crocheted dog, the diagram and description of which will be discussed later, special attention should be paid to the filler.
Currently, there is a choice on the market, and the variety is so great that you instantly get lost in the desired idea. Therefore, you need to determine in advance what qualities crocheted dogs should have with diagrams and descriptions.
For example, if you want a product to have relaxing effects, then polystyrene balls would be an ideal option. In another case, synthetic fluff, holofiber and synthetic padding will add softness and lightness. And if you are trying to create an organically clean toy, then sawdust and shavings will help you perfectly in this matter.
Warm threads
You can also talk about yarn for a very long time. With all its diversity, first of all, base it on your preferences. So, if you do not want your knitted product to be covered with pills, fluffy and electrified, then yarn with a high content of synthetic fibers is perfect for you. And vice versa, if you need a crocheted dog, the pattern and description of which we will describe a little later, to have air fluff, then choose mohair or threads with a large percentage of natural wool.
In addition, before the process of making a toy, you should not run to the store for new skeins of yarn. Due to the fact that the product is knitted using a special technique, we will need a small amount of thread, trimmings and remnants of which you will definitely find at home.
What is amigurumi

You should not be afraid of such a name when you hear it for the first time, since the difficulty of pronunciation and memorization of the word is not at all justified in practice. So, amigurumi is the Japanese art of crocheting various toys. These can be almost invisible animals, as well as large-scale pillows, hats and other elements containing many details.
Since this is an eastern current, it is accompanied by very cute faces, colors and shapes of toys. In addition, the silhouette of amigurumi is its main feature, thanks to which it is so recognizable throughout the world. Rounded shapes, slightly bulky heads, a huge number of tiny details: all this emphasizes the individuality of this knitting style. These will be our knitted dogs, the description of which we will consider in detail right now.
A little more necessary
When listing, we did not name all the necessary components that the toy will consist of. You can find all additional materials in stores for creativity, handicrafts or sewing.
- Hook. In this case, we cannot say for sure which exact hook size will suit you. Therefore, the choice is yours, since it directly depends on the thickness of the yarn. In addition, when buying a tool, pay attention to the handle and its connection with the metal part, because this is the main point of failure, even for a new thing.
- Beads or ready-made eyes to create a muzzle.
- Floss threads. They will also help us add individual features to the toy's face.
Special signs
Also, while making a crocheted dog (with diagrams and descriptions), we will introduce you to special abbreviations that are often used in knitting circles. We will also use them in our work, but for faster understanding and memorization, their transcript will also be nearby.
- KA - amigurumi ring. It is a kind of basis for any toy and is done in just a couple of seconds.
- RLS - single crochet. This is the second most used “pattern” in the amigurumi technique, since it is very small and neat, and the canvas of the finished product looks very solid.
- UB is the usual process of decreasing stitches.
- PR is the reverse process of adding loops.
- VP - air loop - the basis of any crochet product.
Crocheted dogs: patterns and description of the process

It's time to start making the toy. To make everything clear and avoid any questions, we will describe all the steps step by step in as much detail as possible. This will not only simplify the process of perceiving information, but also speed up the work process.
- First, let's tie the upper legs: to do this, use threads of the color of the future toy dog to make an amigurumi ring (KA) and knit 6 single crochets into it (SC). Tighten the ring a little to give it a neat shape. Now in the new row in each single crochet (SC) we make two of the same loops: in total there will be 12 finished loops in the row.
- Now we increase every second single crochet (SC) to get 18 loops in the row. In this way, we gradually increase the handle, then knitting two stitches (RS) in every third element. If you count, you should end up with 24 loops.
- Now we change the color of the thread, as the sleeve of the blouse begins. You choose its color yourself, and we’ll take light green. We knit the first row with a thread of a new color, and then make a decrease (UB). To do this, you need to knit every 3 and 4 loops together. As a result, you will be left with 18 single crochets (SC).
- Now from the seventh to twenty-fourth rows we simply knit all single crochets (RS). As a result, we get a long green “pipe”. When all the rows are ready, we stuff the foot, leaving a little empty space, fold the pipe hole in half and carefully knit the loops together, getting the finished part. We also make the second foot.
- We move on to making the hind legs: we knit a heel from dark yarn, casting on a chain of 10 air loops (VP). Now, starting from the second loop, we knit 8 single crochets (SC), in the 9th loop we make an increase (PR) of five stitches and again 8 single crochets (SC). We make the 1st stitch (RS) in the new row, in the 2nd we make an increase (PR), knit 6 more loops, in the next two columns we make the 1st increase (PR), and then we create 2 more single crochets ( SBZ).
- We knit the next half in a mirror order, as we knitted the first part, getting 28 loops at the end of the row. In the new row we make 10 single crochets (SC), in the next 9 loops we make 1 increase each, and then again 10 loops. In total, you get 38 columns that complete the heel.
- Now we take a thread the color of our dog’s fur with a crochet stitch, the diagrams and descriptions of which we are gradually becoming familiar with, and knit all 38 stitches. In the new row we knit 10 loops, and the next 12 we make decreases (UB), completing the row again with 10 stitches. Then we knit 12 loops, 5 decrease stitches and again 12 loops. We start the row with 8 single crochets, make 6 decrease stitches, turning them into 3 stitches, and completing the row with 9 stitches. There are 23 columns in total.

Change the thread to a dark color representing the pants, knit the first 23 single crochets (SC). We knit in this way from the 10th to the 23rd rows. We cut the thread of the first leg, carefully tucking it into the fabric, and leave the thread of the second leg untouched. Don't forget to add filler.
Soft tummy
Now that the legs and arms are ready, let's start making the body. It was not in vain that we left the thread on one of the lower legs, since it is from it that we will continue to knit the body of the toy.
- In the 23rd row we knit all the loops along the leg, then we cast on 10 chain loops and again 23 stitches near the second leg. We knit the resulting 56 loops over the next 3 rows. And in the 4th row we decrease, getting 50 single crochets. This way we knit 4 rows.
- In the 5th row, we reduce the total number of loops by 7 parts, change the thread to the green color of the sweater and knit 43 loops for 3 rows. Again we decrease by 6 loops, but we already make 11 rows of 36 stitches, again we decrease by 6 loops and knit 2 rows. In the next row we decrease by another 6 loops, make one row and leave the thread for further fastening.
- We knit the head according to the pattern below, cast on 60 stitches, make 9 rows, and then go to decrease, filling it in advance with padding polyester.
Mustache, lips and tail
We knit the ears and muzzle according to the same pattern, but in different colors, making an amigurumi ring, stitching stitches into it and knitting rows. In the end, we should get a “cup” from which we will make ears, fold them in half, knit the muzzle, and fill the blank with padding polyester.

Now you can put everything together: sew the ears, muzzle, eyes to the head, outline the nose and mouth, sew the head and limbs to the body.
As a decoration, we will tie a long scarf and straps onto the pants, which we will fasten with buttons. You can add a dark spot to the head, like real dogs, a forelock of protruding hair. Now that we can handle crocheted dogs with descriptions and patterns, you can safely delight yourself and your loved ones with homemade toys!
A crocheted daisy will be an interesting decoration for various things; it can be used in the form of a brooch, bracelet, or as an element of a necklace. You can decorate your hair with a flower. You can learn how to tie a chamomile from our article, which contains detailed descriptions and photos.
How to crochet a daisy - detailed master class
We will need:
- “Iris” threads, white, green and a small number of yellow flowers;
- hook No.0.7;
- green wire;
- brooch base;
- needle with a large eye.
Description
Petals
See master class: f.1 – f. 9.
We collect a chain of 13 air. p. In the 3rd p. from the hook, knit 1 tbsp b/n, then the pattern is as follows: 1 half tbsp s/n, 7 tbsp s/n, 1 half tbsp s/n, 1 sc (f. 1). We turn the knitting and perform a round tie around the connection. stlb (f.2). At the turn, you need to tie 2-3 stitches into the end stitch so that there is no tightening. The first petal has turned out.
We do not cut the thread; we knit the next one directly from this petal. We collect a chain of 13 air. p. (1.3) The knitting pattern is the same as for the 1st petal.
We use the same master class for knitting the remaining petals. In total they need to be knitted 15 pieces. We get such a garland of petals overlapping each other (f.5).
We knit 1 VP of lifting. We fasten the left half of one petal to the right half of the previous one, knitting a sc along their base. We get 15 stlb. At the end, we close the garland of petals into a ring and continue to knit SC, making decreases at equal intervals. Having completely covered the middle, we finish knitting (f.9). Calculation scheme of decreases:
- 1p.: (1stlb b/n – 1U)x5 times;
- 2 rubles: 5 U.
Master class on the technique of making decreases: insert the hook under two half-loops of the previous stitch. p., pull out the thread, do not knit it, insert the hook under the two half-loops as follows. stlb, pull out the thread, knit all 3 stitches on the hook.
Yellow chamomile heart
See master class: f. 10- f. 12.
Knit the piece in a spiral sc, increasing the number of stitches: 6→12→18→24.
The hook must be inserted under two half-loops. We make an increase by knitting the previous stitch from the loop. R. 2 sc:
- 1st round: knit 6 sc into an amigurumi ring;
- 2p.: +6 additions;
- 3p.: (+1 inc., 1 RLS)x6 times;
- 4p.: (2 RLS, +1 inc.)x6 times.
Cut the thread, leaving a long tail. We need it to sew the core to the petals (f. 11). Before the last stitches, we put a little filler under the middle (f. 12). We bring the thread to the wrong side, fasten it and cut it.
Leaves
See master class: f. 13 – f.15.
We collect 22 VP. We skip 2 stitches and knit 2 stitches 3rd from the hook. without nak., 3 half-columns. with nak., 10 columns. with nak., 3 half-columns. with nak., 2 columns. with nak. (f. 13). We turn the knitting, apply a wire 25 cm long and knit around the perimeter, tying the wire:
- 2 columns b/n, 1 half column. with nak., 1 SSN, 2 air. p., 1 connection pillar. at the base of the last pillar;
- 1 column b/n, 1 pstlb s/n, 1 column. s/n, 1 СС2Н, 3 air. p., 1 connection pillar. at the base of the last pillar;
- 1 column b/n, 1 pstlb s/n, 1 column. s/n, 1 СС2Н, 1 СС3Н, 4 air. p., 1 connection pillar. at the base of the last pillar;
- 1 column b/n, 1 pstlb s/n, 1 SSN, 1 СС2Н, 3 air. p., 1 connection pillar. at the base of the last pillar;
- 3 sc, at the end knit 2-3 sc, 3 sc;
- 1 sc, 4 VP, 1 sts/3n at the base of the chain of VP, 1 post with 2 nac., 1 dc, 1 half sts, 1 sc;
- 1 sc, 3 VP, 1 sts/2n at the base of the chain of VP, 1 dc, 1 half sts, 1 sc;
- 1 RLS, 32 VP, 1 StS/N at the base of the VP chain, 1 half-column with a chain, 2 RLS.
Using this master class, knit 2 more smaller leaves. For them, we select the initial chain from a smaller number of VPs and reduce the height and number of teeth on the sheet.
Bud
See master class: f. 16- f.24
We knit like a flower, but with shorter petals: we cast on the original 10 VPs. In addition, for more elegant petals, dc and semi-dc, we replace the sc, reduce their number: knit 13 pcs.
Increase scheme for the core: 6→12→18. For a green cup: 6→12→18→24. Sew the core onto the flower. We thread the flower through the bottom with a 25cm long wire and bend it in half (f.19).
We string a cup onto a wire and attach it to the petals (f. 21).
We attach a green thread to the base of the cup and tightly tie the wire - sc stem to the desired length (f. 23).
As the process progresses, we attach a small leaf to the stem (f. 24).
We knit a cup 6→12→18→24→30→36 (f. 25).
After 5th p.m. we connect the stem, knit 2-3 stitches without a stitch, connect a leaf, knit 2-3 stitches without a stitch, connect another leaf, finish the row.
We fasten the tails of the threads on the wrong side and cut them off. We twist the ends of the wire into a common bundle and lay it in a ring (f. 29). Sew the cup to the petals. Sew on the base for the brooch.
Crocheted daisy is ready!
Crochet daisy in Irish lace: MK video
Knitted daisy with voluminous petals
We will need:
- yarn, 100% acrylic, white, green and yellow;
- decorative eyes;
- button in the shape of a ladybug;
- thin wire for the frame;
- filler;
- hook No. 2.5.
Description
Petals
We cast on 3 VPs with white yarn. Then - see the master class in the photo and description:
- 1st row: in the 1st stitch from the hook, knit 6 single crochets.
- 2p.: + 6st. = 12 tbsp b/n;
- 3rd: (Stbn, +1pr.) = 12 Stbn b/n;
- 4p.: (StBN, +1pr.)x6=18 StBN;
- 5p.: 18 columns. without nac.;
- 6p.: (2 StBN, +1pr.)x6=24 StBN;
- from 7r. for 8 rubles: 24 tbsp. without n.;
- 9p.: (6 StBN, -1ub.)x3=21 StBN;
- 10 rubles: 21 columns. without n.;
- 11p.: (5 StBN, -1ub.)x3=18 StBN;
- 12p.: 18 columns. without n.;
- 13 rubles: (4 StBN, -1ub.)x3=15 StBN;
- from 14r. for 15 rubles: 15 columns. without n.;
- 16 rubles: (3 StBN, -1ub.)x3=12 StBN;
- from 17r. for 18 rubles: 12 columns. without n.
You need to knit 10 petals.
Carrying out the last row, we connect the petals together at the 6th and 12th columns.
The next stage is filling the middle of the flower. We have double petals, we will knit along one side of them, in a spiral. Reduce the number of columns: 54→48→42→36→30→24→18→12→6. The knitting pattern is as follows:
- 1st round: (8 StBN, -1 dec.)x6=54;
- 2p.: (7 StBN, -1 dec.)x6=48;
- 3p.: (6 StBN, -1 dec.)x6=42;
- 4p.: (5 StBN, -1 dec.)x6=36;
- 5p.: (4 StBN, -1 dec.)x6=30;
- 6p.: (3 Stbn, -1 dec.)x6=24;
- 7p.: (2 StBN, -1 dec.)x6=18;
- 8p.: (1 StBN, -1 dec.)x6=12;
- 9 rubles: (-1 dec.) x6 = 6.
Finally, we knit 6 stitches together, cut and fasten the thread.
We make a frame from wire and insert it into the petals.
We knit the middle in a spiral on the second side and close the hole completely.
Now we will knit a green circle.
- 2p.: (+1pr.)x6=12 st.b/n;
Yellow center of the flower
- 1st row: in the 1st st from the hook, knit 6 sc;
- 2p.: (+1pr.)x6=12 st.b/n;
- 3p.: (1 column without/n, +1 space)x6=18 st.b/n;
- 4p.: (2 columns without/n, +1 space)x6=24 st.b/n;
- 5p.: (3 columns without/n, +1 cr.)x6=30 st.b/n;
- 6p.: (4 columns without/n, +1 space)x6=36 st.b/n;
- 7p.: (5 columns without/n, +1 space)x6=42 st.b/n.
- from 8 rub. for 9 rubles: 42 st.b/n.
Sew the yellow center onto the front side of the daisy.
Spout
- 1st row: in the 1st st from the hook, knit 6 S/BN;
- 2p.: (1 S/BN, +1 cr.)x6= 12 st.b/n;
- 3p.: (1 S/BN, +1 cr.)x6=18 st.b/n;
- from 4r. for 6 rubles: 18 st.b/n;
- 7p.: (1 st.b/n, -1 dec.)x6=12 st.b/n.
Fill the nose with filler. We continue knitting:
- 8p.: 6 columns. b/n.
Then we knit all the stitches together. We do not cut the thread. Using it, we attach the nose to the middle of the flower.
Stem
Knit in the round with 12 S/BN until the desired length is obtained.
Chamomile leaves can be tied if desired using the previous master class.
Crochet a daisy: video master class
Large chamomile with contour petals
We will need:
- white and yellow yarn, 50g per 150m;
- hook No. 2.5.
Knitting pattern - see below.
Description and master class with photos
We collect a chain of 5 chain stitches and close them into an SS ring.
Next we will knit lush columns in a circle. We do 3 air. lifting point. Next is a lush stitch: * yarn over the hook, insert the hook into the center of the original ring, grab the thread and pull out a long stitch equal in height to three lifting loops * Repeat from * to * twice. We get several elongated sts on the hook.
We grab the working thread and knit all stitches from the hook, then knit 1 ch.
Through 1 VP we knit another 11 fluffy sts. We complete the circle. R. SS at the top of the lush st. We cut the thread, bring the end to the wrong side and fasten it.
Now we will knit white petals. We connect the thread to the top of any lush stem. We collect 15 VP, fasten the chain S/BN from the top of the same post.

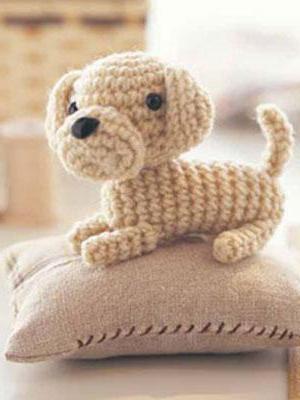
With the advent of small children in the family, many needlewomen begin to knit more and more things for their kids - blouses, skirts, dresses... Not the least place on this list is occupied by hand-made children's toys. In today’s master class we will look in detail at an example of how to crochet dog toys, so even if you have just recently mastered the crochet hook, don’t be afraid to try it!
For work we need:
- beige yarn for the body, head and paws, lilac for the ears, tail and nose, leftover black and white yarn for finishing;
- hook;
- holofiber;
- a little felt;
- needle;
- scissors.
Description of work
We will knit in a spiral with single crochets (hereinafter s. without n.) for both half-loops.
Important! We knit the first 2-3 rows counterclockwise, after which we turn the knitting inside out and continue working clockwise, leaving the tail of the thread inside.
Head
We crochet with beige thread.
12-15 pp.: p. without n. = 66 s. without n..
17 r.: p. without n. = 64 s. without n..
18 p.: *30 s. without n., ub.*, x 2 = 62 s. without n..
19 r.: p. without n. = 62 s. without n..
20 r.: *29 p. without n., dec.*, x 2 = 60 s. without n..
21 r.: p. without n. = 60 s. without n..
22 p.: *28 p. without n., ub.*, x 2 = 58 s. without n..
23 r.: p. without n. = 58 s. without n..
24 p.: *27 p. without n., ub.*, x 2 = 56 s. without n..
25 r.: *12 s. without n., ub.*, x 4 = 52 s. without n..
26 rubles: *11 s. without n., ub.*, x 4 = 48 s. without n..
27 r.: *6 p. without n., ub.*, x 6 = 42 s. without n..
28 r.: *5 s. without n., ub.*, x 6 = 36 s. without n..
29-34 pp.: p. without n. = 36 s. without n..
We stuff the dog’s face with holofiber and continue according to the diagram:
35 rub.: *5 s. without n., ex.*, x 6 = 42 s. without n..
36 rubles: *6 s. without n., ex.*, x 6 = 48 s. without n..
37-41 pp.: p. without n. = 48 s. without n..
42 rub.: *dec., 6 p. without n.*, x 6 = 42 s. without n..
43 rub.: *dec., 5 s. without n.*, x 6 = 36 s. without n..
44 rubles: *dec., 4 s. without n.*, x 6 = 30 s. without n..
45 rub.: *dec., 3 p. without n.*, x 6 = 24 s. without n..
46 rub.: *dec., 2 p. without n.*, x 6 = 18 s. without n..
47 rub.: *dec., 1 p. without n.*, x 6 = 12 s. without n..
48 rub.: ub. x 6 = 6 s. without n..
We completely stuff the toy part.
Eyes
We knit 6 s with black yarn. without n. into an amigurumi ring and tighten the thread, leaving a small tail for sewing together the parts of the toy. We make two such blanks - these will be the pupils of the eyes.
After this, we crochet the whites of the eyes with white thread according to the diagram:
1 p.: 6 s. without n. in an amigurumi ring.
2 p.: pr. x 6 = 12 s. without n..
3 p.: *ex., 1 p. without n.*, x 6 = 18 s. without n..
5 rubles: *dec., 1 s. without n.*, x 6 = 12 s. without n..
We knit two eyelids with beige threads.
1 p.: 6 s. without n. in an amigurumi ring.
2 p.: 6 inc. = 12 s. without n..
3 p.: *1 pr., 1 s. without n.*, x 6 = 18 s. without n..
4 p.: *1 pr., 2 s. without n.*, x 6 = 24 s. without n..
Tighten the thread, leaving a little for sewing together the parts of the dog.
We sew the eyelids to the head, add just a little holofiber inside, after which we sew on the whites of the eyes and then the pupils.
Spout
1 p.: 4 s. without n. into an amigurumi ring, leave a long tail and continue according to the diagram:
2 p.: *1 pr., 1 s. without n.*, x 2 = 6 s. without n..
3 p.: *1 pr., 2 s. without n.*, x 2 = 8 s. without n..
4 p.: *1 pr., 3 s. without n.*, x 2 = 10 s. without n..
5 p.: *1 pr., 4 s. without n.*, x 2 = 12 s. without n..
6 p.: *1 pr., 5 s. without n.*, x 2 = 14 s. without n..
7 p.: *1 ave., 6 p. without n.*, x 2 = 16 s. without n..
8 p.: *1 ave., 7 p. without n.*, x 2 = 18 s. without n..
9 p.: *1 ave., 8 p. without n.*, x 2 = 20 s. without n..
Tighten the thread, leaving a little for sewing together the parts of the dog.
We flatten the resulting cap into a triangle and sew the nose onto the face of the toy. We embroider the mouth with a tail thread.
Ears
We use lilac thread.
1 p.: 6 s. without n. in an amigurumi ring.
2 p.: 6 inc. = 12 s. without n..
3 p.: *1 pr., 1 s. without n.*, x 6 = 18 s. without n..
4 rubles: p. without n. = 18 s. without n..
5 p.: *1 pr., 2 s. without n.*, x 6 = 24 s. without n..
6-10 pp.: p. without n. = 24 s. without n..
11 p.: *1 kill, 10 s. without n.*, x 2 = 22 s. without n..
12-14 pp.: p. without n. = 22 s. without n..
15 rubles: *1 kill, 9 p. without n.*, x 2 = 20 s. without n..
16-18 pp.: p. without n. = 20 s. without n..
19 rubles: *1 kill, 8 s. without n.*, x 2 = 18 s. without n..
20-22 pp.: p. without n. = 18 s. without n..
23 rubles: *1 kill, 7 s. without n.*, x 2 = 16 s. without n..
24-26 pp.: p. without n. = 16 s. without n..
27 rubles: *1 kill, 6 s. without n.*, x 2 = 14 s. without n..
28 rubles: *1 kill, 5 s. without n.*, x 2 = 12 s. without n..
29 rub.: 6 ub. = 6 s. without n..
Tighten the thread, leaving a little for sewing the parts of the dog. We do the second ear in exactly the same way.
Torso
We continue crocheting with beige thread.
1 p.: 6 s. without n. in an amigurumi ring.
2 p.: 6 inc. = 12 s. without n..
3 p.: *1 pr., 1 s. without n.*, x 6 = 18 s. without n..
4 p.: *1 pr., 2 s. without n.*, x 6 = 24s. without n..
5 p.: *1 pr., 3 s. without n.*, x 6 = 30 s. without n..
6 p.: *1 ave., 4 s. without n.*, x 6 = 36 s. without n..
7 p.: *1 pr., 5 s. without n.*, x 6 = 42 s. without n..
8 p.: *1 ave., 6 p. without n.*, x 6 = 48 s. without n..
9 p.: *1 ave., 7 p. without n.*, x 6 = 54 s. without n..
10 p.: *1 ave., 8 p. without n.*, x 6 = 60 s. without n..
11 p.: *1 ave., 9 p. without n.*, x 6 = 66 s. without n..
12-14 pp.: p. without n. = 66 s. without n..
15 p.: *31 p. without n., ub.*, x 2 = 64 s. without n..
16 r.: p. without n. = 64 s. without n..
17 p.: *14 p. without n., dec.*, x 4 = 60 s. without n..
18 r.: p. without n. = 60 s. without n..
19 p.: *13 p. without n., ub.*, x 4 = 56 s. without n..
20 r.: p. without n. = 56 s. without n..
21 r.: *12 s. without n., ub.*, x 4 = 52 s. without n..
22 r.: p. without n. = 52 s. without n..
23 r.: *11 p. without n., ub.*, x 4 = 48 s. without n..
24 r.: p. without n. = 48 s. without n..
25 rub.: *10 s. without n., ub.*, x 4 = 44 s. without n..
26 r.: p. without n. = 44 s. without n..
27 r.: *9 p. without n., dec.*, x 4 = 40 s. without n..
28 r.: p. without n. = 40 s. without n..
29 r.: *18 p. without n., ub.*, x 2 = 38 s. without n..
30 rub.: p. without n. = 38 s. without n..
21 r.: *17 p. without n., ub.*, x 2 = 36 s. without n..
32 r.: p. without n. = 36 s. without n..
33 r.: *16 p. without n., ub.*, x 2 = 34 s. without n..
34 r.: p. without n. = 34 s. without n..
35 rub.: *15 s. without n., ub.*, x 2 = 32 s. without n..
36 r.: p. without n. = 32 s. without n..
37 r.: *14 s. without n., dec.*, x 2 = 30 s. without n..
38 r.: p. without n. = 30 s. without n..
RUR 39: *13 p. without n., ub.*, x 2 = 28 s. without n..
40 rub.: *12 s. without n., ub.*, x 2 = 28 s. without n..
41 r.:*11 p. without n., ub.*, x 2 = 24 s. without n..
42 rub.: 12 ub. = 12 s. without n..
43 rub.: 6 ub. = 6 s. without n..
Tighten the thread, leaving a little for sewing the parts of the dog. We stuff the body with holofiber.
Forepaws
Crochet with beige thread.
1 p.: 6 s. without n. in an amigurumi ring.
2 p.: 6 inc. = 12 s. without n..
3 p.: *1 pr., 1 s. without n.*, x 6 = 18 s. without n..
4 p.: *1 pr., 2 s. without n.*, x 6 = 24 s. without n..
5 p.: *1 pr., 3 s. without n.*, x 6 = 30 s. without n..
6 p.: *1 pr., 1 s. without n.*, x 6 = 18 s. without n..
7 p.: *1 ave., 17 p. without n.*, x 2 = 38 s. without n..
8 p.: *1 ave., 18 p. without n.*, x 2 = 40 s. without n..
9 p.: *1 ave., 19 p. without n.*, x 2 = 42 s. without n..
10 p.: *1 ave., 13 p. without n.*, x 3 = 45 s. without n..
11 p.: *1 ave., 14 p. without n.*, x 3 = 48 s. without n..
12-14 pp.: p. without n. = 48 s. without n..
15 r.: *10 s. without n., ub.*, x 4 = 44 s. without n..
16 r.: p. without n. = 44 s. without n..
17 p.: *9 p. without n., dec.*, x 4 = 40 s. without n..
18 r.: p. without n. = 40 s. without n..
19 r.: *8 p. without n., ub.*, x 4 = 36 s. without n..
20 r.: p. without n. = 36 s. without n..
21 r.: *2 s. without n., ub.*, x 9 = 27 s. without n..
22-41 pp.: p. without n. = 27 s. without n..
42 r.: *7 p. without n., ub.*, x 3 = 24 s. without n..
43 rubles: *2 s. without n., ub.*, x 6 = 18 s. without n..
44 rubles: *1 p. without n., ub.*, x 6 = 12 s. without n..
Tighten and cut the thread as usual, leaving a tail. We do the second leg in the same way.
Hind legs
We continue knitting with the same beige thread.
1 p.: 6 s. without n. in an amigurumi ring.
2 p.: 6 inc. = 12 s. without n..
3 p.: *1 pr., 1 s. without n.*, x 6 = 18 s. without n..
4 p.: *1 pr., 2 s. without n.*, x 6 = 24 s. without n..
5 p.: *1 pr., 3 s. without n.*, x 6 = 30 s. without n..
6 p.: *1 ave., 4 s. without n.*, x 6 = 36 s. without n..
7 p.: *1 pr., 5 s. without n.*, x 6 = 42 s. without n..
8 p.: *1 ave., 6 p. without n.*, x 6 = 48 s. without n..
9 p.: *1 ave., 7 p. without n.*, x 6 = 54 s. without n..
10 p.: *1 ave., 8 p. without n.*, x 6 = 60 s. without n..
11 p.: 60 s. without n. we crochet the back half-loop to form a “cuff” when moving from the sole to the foot.
12-14 pp.: 60 s. without n. in the usual way.
15 p.: 18 p. without n., ub., 20 s. without n., ub., 18 p. without n. = 58 s. without n..
16 p.: 17 p. without n., ub., 20 s. without n., ub., 17 p. without n. = 56 s. without n..
17 p.: 16 p. without n., ub., 20 s. without n., ub., 16 p. without n. = 54 s. without n..
18 p.: 15 p. without n., ub., 20 s. without n., ub., 15 p. without n. = 52 s. without n..
19 p.: 14 p. without n., ub., 20 s. without n., ub., 14 p. without n. = 50 s. without n..
20 r.: 13 s. without n., ub., 8 p. without n., 2 dec., 8 s. without n., ub., 13 p. without n. = 46 s. without n..
21 r.: 12 s. without n., ub., 7 p. without n., 2 dec., 7 s. without n., ub., 12 p. without n. = 42 s. without n..
22 r.: 12 s. without n., *ub., 1 p. without n.* repeat ** x 6, 12 s. without n = 36 s. without n..
23 r.: *dec., 4 s. without n.*, x 6 = 30 s. without n..
24-43: p. without n. = 30 s. without n..
44 rub.: *dec., 3 p. without n.*, x 6 = 24 s. without n..
45 rub.: *dec., 2 p. without n.*, x 6 = 18 s. without n..
46 rub.: *dec., 1 p. without n.*, x 6 = 12 s. without n..
We tighten the thread and cut it, leaving a long end for sewing the toy together. We crochet the second leg in the same way, after which we stuff both parts of the toy with holofiber.
Tail
We use lilac thread.
1 p.: 6 s. without n. in an amigurumi ring
2 p.: *ex., 2 p. without n.*, x 2 = 8 s. without n..
3 rubles: p. without n. = 8 s. without n..
4 p.: *ex., 3 s. without n.*, x 2 = 10 s. without n..
5 rubles: p. without n. = 8 s. without n..
6 p.: *ex., 4 p. without n.*, x 2 = 12 s. without n..
7 p.: p. without n. = 12 s. without n..
8 p.: *ex., 5 p. without n.*, x 2 = 14 s. without n..
9 r.: p. without n. = 14 s. without n..
10 p.: *ex., 6 p. without n.*, x 2 = 16 s. without n..
11-15 pp.: p. without n. = 16 s. without n..
Tighten the thread and cut it, leaving a long piece for sewing the tail to the dog’s body.
Collar
Using lilac yarn, we crochet a chain of 30 sts. p. and knit all the loops with double crochets.
Assembly
We sew the head of the dog to the body, wrap the collar around the neck and sew it together. After this, you need to sew the ears to the dog’s head, and the paws and tail to the toy’s body. If desired, you can embroider the toes on the paws with a contrasting thread and sew on felt circles that will serve as pads on the hind paws. Knitting the toy is finished!
We hope our lesson will be useful for you. Happy knitting!
Crochet puppy: video master class
Selection of schemes


Cute crocheted dogs of all possible shapes, sizes and colors make great gifts. They will delight adults as a thematic gift, becoming an original part of the interior, and for children, knitted dogs will be a bright, beautiful and safe toy.
The options for crocheted dogs are many and varied, ranging in size from miniature amigurumi to full-size toys, from certain breeds of puppies to fantasy designs. You can create lying and sitting dogs, or anthropomorphic doggies dressed in exclusive outfits. Whatever toy is ultimately conceived, the general rules for creation, the set of necessary materials and tools will always be approximately the same.
What you need to knit a dog
Before you start crocheting a dog, you should prepare everything you need that may be useful in your work:
- yarn;
- hook;
- filler;
- needle;
- scissors;
- elements for decorating the product.
You can use any yarn to knit a dog, but cotton threads are best, especially if the toy is intended for a child. The hook should be selected according to the thickness of the thread, it would be a good idea to take a hook one size smaller, then the knitting will be quite tight, this will help the toy maintain its shape and will not allow the filler to crawl out through the loops.
Synthetic padding polyester or holofiber are good fillers, which, unlike cotton wool, will not clump together and will make the product soft and pleasant to the touch. The dog's eyes can be made from buttons, knitted, embroidered, or purchased. If a creative idea involves making a costume or its elements, then you need to take into account that it should be knitted from thinner threads than the toy itself. Pieces of felt, leather or any other materials can be used to decorate the product, depending on the concept.
Crochet dogs, descriptions from our website
Amigurumi dog toy, work of Ksenia
The new year is just around the corner; according to the eastern calendar, we will spend the next year in the company of a dog - a kind and devoted animal, a long-time friend of man. To appease an already good-natured creature, you can tie a symbol of the future

Good afternoon The Year of the Rooster has barely crowed, and needlewomen, judging by the publications, are already thinking hard about the symbol of next year. I’ll also add my two cents to the collection of all kinds of dogs. Dog Rex from the Polish cartoon of the same name
Knitted dog toy from Elena Aistova

I will present dogs in three sizes. All the toys were tested, I knitted them to order, the customers were very satisfied. Large and medium dogs are crocheted No. 1.6, Alize Shekerim yarn, 100% acrylic. I made bows from felt and

Dog Chamomile. New children's yarn (yellow, brown and white colors). Hook No. 2. Height 22 cm. Eyes, nose and pattern are embroidered. Linked according to the description of Venelopa'toys. For a description of the dog, see the link.
Amigurumi dogs from Katerina Petyanina

To knit amigurumi you will need: Yarn “Children's New” from Pekhorka Hook No. 2.0. Yarn in white, blue and blue colors. Black eyes for toys or beads. Needle for sewing soft toys. Filler. Dog, description Knitting a dog's head. 1st row: 6 tbsp. b/n in amigurumi ring
Chishechka - smiley, crochet dog from Alexandra Lisitsina

Chishechka - crochet smile. To knit a dog you will need: - hook 2.0 - Areola yarn, acrylic (white and black) - finished nose on a fastening (can be embroidered with black thread) - dry pastel for tinting - bow Legend: ss - connecting stitch sc - single crochet pssn -
Crochet a toy dog, ideas from the Internet
Knitted shepherd type dog
Translation: Ekaterina Ruban.
This simple pattern is also suitable for beginner knitters.
Necessary materials:
- Threads are basic colors, a little white, black, pink, gray and yellow.
- Thread-matching hook
- Filler
- White and black felt
- Pins
Materials:
- Yarn Kamtex “Lotus Grass Stretch”, about ½ skein of white and a little black;
- Hook No. 3;
- Eyes and nose;
- Holofiber;
- Wire for ears and tail;
- Black oil pastel and a hard brush;
- Black thread for embroidery.
- When using these materials, the height of the toy is 11.5 cm.
Crochet dog
For work we will need:
- yarn (preferably fluffy)
- hook suitable for your yarn
- filler
- scissors
- needle
- eyes
- spout
- harsh threads (for tightening)
Crochet amigurumi dog
I suggest crocheting a small dog that will become a cute souvenir. I'll be very happy to see what you come up with, so
be sure to send photos.
Materials:
the toy is the size of your palm, so for comfortable knitting, use yarn of medium thickness. The example in the photo is crocheted from Gazzal Baby Cotton (60% cotton, 40% acrylic, 165m in 50g) with 2.2 mm crochet.
You will also need filler and half-bead eyes (I have 8 mm).
Crochet dogs in clothes
The height of dogs made from these materials is 9-10 cm.
Materials and tools:
- acrylic 100g/300m or any other yarn of your choice:
- main color (beige), white (for the muzzle), brown (for the ears),
- hook No. 1.8-2, or suitable for your yarn
- filler
How to crochet a dog from Vendulka

Crochet dogs in love
Crochet red dog
Crochet a cute puppy
How to Crochet a Bulldog Dog
